Pages

November 24, 2010

Knitting Needle Roll up Holder - Tutorial

A friend of mine asked me recently if I could make her a roll up holder for her knitting needles.  Previously, she had had them clanking around in the bottom of her knitting bag...so of course I told her I would make her one!
This pouch has twelve slots in the tall pocket, and six slots in the short pocket.  
It has a fold over and velcro top, to keep the needles from falling out.
And it rolls up and secures with a tie. 
Here's how you can make your own:

For the large pieces of fabric that make up the front and back of the pouch cut two (2) pieces of fabric each 17" wide x 20" tall.
For the tall pocket cut one (1) piece of fabric 17" wide x 9" tall.
For the short pocket cut one (1) piece of fabric 17" wide x 5" tall.

I made each of these pieces of fabric in different, coordinating colors - but you can certainly make them all the same color if you want:)

The decorative lining on the top of each pocket is made with a piece of fabric 17" wide x 2" tall.  Cut two (2) pieces of fabric 17" x 2". 

To begin, take your tall pocket (17" x 9") and, with right sides together, sew the lining piece to the top of the pocket.
 Open and press flat with an iron. 
 Fold the top edge back by 1/2" and iron.
 Fold it over once again (past the seam) and iron.  This creates the strip across the top of your pocket.
 From the front, it will look like the picture below.  Sew the folds in place by sewing as close to the seam as you can, all the way across the top of the pocket. 

Place the pocket on top of the inside piece of fabric, which measures 17" x 20".  Align the pocket and this large piece of fabric along the bottom edge as shown.  Both right sides of the fabric will be facing you. 
Pin it in place, and start marking your lines.

First, measure in 1" from each side.  I usually make a mark toward the bottom of the pocket, a mark toward the top of the pocket, connect the marks with a ruler and draw my line. 
From that 1" mark, start marking every 1.25" until you go all the way across the pocket.  You should meet up perfectly with the 1" mark on the other side. 

Do not sew along the mark 1" from each edge - but do sew along each other line (shown in red below). 

To add an additional pocket, sew the decorative edge along the top of the 17" x 5" piece, in the method previously shown. 
Line the pocket up along the bottom of the larger pocket and pin.
Using the stitching lines from the larger pocket as a guide, mark lines along every other stitch line, to make wider pockets.  Begin at the 2nd stitch line in, and mark every other stitch line. 

Then, sew up the marked lines on the smaller pocket only. 
Take a length of ribbon which will become the tie.  Fold it in half, and place the fold near the top of the larger pocket, hanging over the edge slightly, with the ribbon ends facing in. 
Pin the ribbon in place at the edge. 
Take the other 17"x20" piece of fabric, which will become the outside of the holder, and place it, right sides together on top of the entire piece that has the pockets on it. 
The ribbon will be smashed inside.
Pin very well along all the edges. 

Sew around the entire outside edge, using 1/2" seam allowance, and leaving a 3" opening along the top to turn it right side out. 
Turn the holder right side out through the hole, and push the corners out.  You could iron it very flat at this point - making sure that they opening is folded in. 
Top stitch around the entire outside edge using 1/8" seam allowance.
But sure to stitch multiple times over the section securing the ribbon to fortify it. 
In order to ensure that the needles to not fall out, the top can be flipped down.  Velcro will fasten the flap.
Sew velcro into the two top corners
Using your longest knitting needle, fold the top down and place the corresponding velcro the appropriate distance from the top.
Make sure you heat seal the ends of the ribbon, or fold them over and sew them.
Your knitting needle holder is ready to fill and roll up!
The would be the perfect gift for a knitting friend (or a crocheting friend! this pattern can be adapted to fit crochet needles as well).


image signature


I am linking up to:

November 21, 2010

Christmas Silhouettes - Personalize it with Your Own Picture!


Yay for my first Christmas decoration of the year!  I LOVE how these turned out - and they were so easy:)  I of course love them because they are made from silhouettes of my two little sweeties.  You can personalize your own with pictures of your kids, or grandkids, or yourself! 
I was definitely inspired by this post here - and I still may make those darling ornaments.  But, I had already made these silhouette paintings, and couldn't resist decorating them for Christmas.  Check out my other blog post to see how I traced pictures of my kids and painted them onto these canvases from the craft store. 
I cut bonnets out of felt, the right size to fit my painted heads.
I added fabric, ribbons, ruffles and holley along the "brim".  I just used things I already had around the house - and there are many more possibilities.
I fastened my embellishments by sewing and/or gluing. 

And then attached the bonnets to the pictures with a dab of hot glue.

I also strung some beads on a string to make a "necklace" which I also fastened with a tiny bit of hot glue.  All the hot glue I used is very minimal, so I may pop the embellishments off after Christmas...but they look so cute, I may make them part of my yearly decor:)


image signature


I'm Linking To:
Visit thecsiproject.com

November 19, 2010

A Few More:)


Can ya tell I'm in love with these?  :)
They are so easy, and they look so fun.  The pictures don't even do them justice!
 Yes, these are going to be Christmas presents this year.  Whip some up!  They are great fun:)
 Make some Cookies in a Jar or Frozen Cookie Dough to go along with them! 

image signature

November 13, 2010

Jean Apron - Colorful, Easy, Fun and Functional!


As many of you probably are - I am already thinking about Christmas presents:)  I saw this Levi Apron and knew exactly who I wanted to make them for - a couple of tween friends of mine!  Coupled with some cookies in a jar that my sister is making, they are going to get a stellar gift!

I did have a bit of trouble following the tutorial, however.  So here are a few steps that I feel make it a bit more clear.

When I cut out my apron shape, I didn't know which end of the pant leg to cut, at first.  I eventually figured out the the bottom of the pant leg becomes the top of the apron, because of the way the pant leg is shaped.

 Also, when it tells you to cut a pocket out of the bum, I didn't know exactly how to do that either.  After originally incorrectly trying to seam rip it out, I realized that I needed to cut all the way around the pocket...
So that it is actually the pocket AND a layer of the pant.  Technically there is a raw jean edge around the outside of the pocket, but you can't see it if you cut very close to the edge.  This top opening will be sewn closed when you add the fabric to the top of the pocket. 
I was also completely baffled as to how much fabric to cut for the edges, and how to cut it....
So, I took the fabric and cut it into 3 inch wide strips, by the length that the fabric comes off the roll (which is usually 40-44").  I cut a total of 5, 3" x 44" strips. 
I sewed 3 of the 5 strips together.  At the short end, put right sides together, sew along the edge, turn right side out.  This made a very long approx. 132" strip.  Then I sewed the remaining 2 strips together the same way to form an 88" strip. 

I folded the edges in by about 1/2" on each side and ironed.
 Then, folded the strip in half and ironed.
Next, I pinned the 88" long strip (the strip made of 2 pieces sewn together) along the 2 sides and the bottom, continuously (yes the fabric just changed:)  Different apron being shown now).  I had to fold the corners carefully.
 It is hard to explain how I folded the corners.  Kindof like a present.  Pinch one side together...
 Fold it up at a 90 degree angle - and the back side will fold the same way. 
Trim the fabric edge right at the edge of the jean as seen below.  You will have enough fabric remaining from the strip used to sew the sides and bottom to also sew it along the top and pocket.  If you don't, use some of the fabric from the really long strip. 
 Sew along the top of the pocket - catching all the fabric to close it off. 
 Tuck the edges under, and sew along the three sides - do NOT sew along the top, so that it remains a working pocket. 
With the really long strip, start by sewing the ends closed.  Turn the end inside out, sew it up.
 Turn it right side out, (now the raw edge is sewed in) and sew up the short edge again. 
Now, take the long strip, find the center and put a pin in it.  Then, decide how long you want the neck loop to be.  I made mine about 14", which was great.  From the center pin, I measured down 7" on each side, and placed a pin. 
 The pins now reference where you should start sewing along the curved edge. 
Make sure you sew along the neck loop and along the long tie strips to sew the open edge closed.
The apron is done at this point!  Really fairly easy - very rewarding - and not too big of a time commitment. 
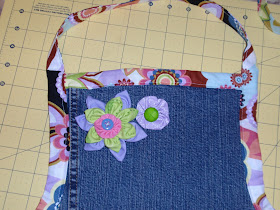
I wanted to fancy mine up a bit, so I added a couple of flowers.  Here is a great tutorial for the kind I made!
I sewed them right onto the apron. 

My sweet model is smaller than the girls I am giving these aprons to.  The aprons I made are a bit too small for an adult (but obviously too big for a toddler).  They measure about 27" in length and 16-17" in width. 
I love them!


image signature

I'm linking up to: