Pages

February 28, 2014

Invitations, Party Favors and Thank You Cards from our Rapunzel Tangled Birthday


The other day I posted about the fabulous Rapunzel Tangled Birthday Party we had for my 5 year old.  

We played Rapunzel games, ate Rapunzel themed snacks - and a few things I didn't post about the other day... we made castle invitations, awesome satchel party favor bags, and some cute personalized thank you cards!


Above you can see all the individual pieces to the castle invitation.  (Here's my inspiration.) I freehand sketched the castle and made sure that it would fit in my envelope.
I heard back from a few of the moms that their girls loved getting this in the mail :)  My daughter drew a picture on the back of each one, which was also really sweet.


The hair is braided yellow yarn, tied with a ribbon and taped to the back of the middle part of the castle.  I simply printed out the invitation words onto pretty paper, making sure they were all centered and skinny and on the right side.  Then I cut the paper down to the correct size, with the words on the right edge, and glued the castle to the left side.


Our party favor bags were probably my favorite part.  I whipped up a few of Flynn Rider's satchels made out of felt!  There were fairly quick and a big hit.  Below is a quick tutorial on how I made them.


For the bag, cut a piece of felt 8" x 24".  You can, of course, make this any size you want.  This was just a good size for the party favors I wanted to put in.

For the strap, cut a piece of felt 1.5" wide x 34" long.  Again, you can make yours shorter if you want!  I had plenty because I buy my felt off the roll, so I made a long strap.

For the patch, I simply cut a different colored piece of felt into a rough square approx. 2" x 2"


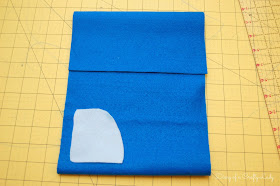
The bag is really simply constructed by taking the large piece of felt and folding the short side 3/4 of the way up, leaving a few inches at the top to fold the flap down.  Check out the two pictures below to see what I mean.

Once you have decided where your folds will be, pin the patch to the bottom left corner of the bag (only catching the top layer of felt), unfold it and zig-zag stitch around the patch.


Next, fold it into a bag shape again, and pin up both sides - leaving the flap open.  Tuck the ends of the strap between the felt on either side of the bag, just before the flap section begins.  (see below)


Top stitch around 3 sides of the bag with 1/4" seam allowance.  You don't need to sew along the bottom fold (although it wouldn't hurt if you did).

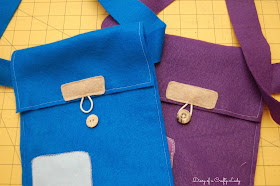
Finally, using an additional scrap of felt, secure a loop of ribbon or cord to the middle of the flap as shown below. I sewed around the scrap of felt, catching the cord in the stitches to secure.

Then sew a button in the appropriate place based on where the loop falls on the bag.  Pull the loop over the secured button to close the satchel.  That's it!


We filled ours with watercolor Rapunzel Paints, dollar store hair brushes and Pascal party blowers (I love these - they make me laugh).


The watercolor paints have a strip of paper I printed off and glued on with a glue stick and say "Rapunzel Paints - Best Day Ever!  Thanks for coming to my party!"


And of course, we love to send thank you cards to our friends to say thank you for coming, and for their gifts.  I love to send mail with a stamp - it is sure to brighten some one's day!  I also love having my kids express their gratitude, and spend time writing a note or drawing a picture for someone.


As we've done at all our parties, I take individual pictures of my birthday girl with each friend, and a picture of the group.  Then, I get the individual and group pictures printed and include them with the thank you card.  It is such an easy and inexpensive way to add a personal touch, and show the parents some pictures from the party.  


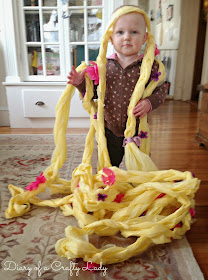
And just because she is so darn cute - here's a picture of the usually bald babe, showing off her new found hair, and showing us how to make those decorations last just a little bit longer ;)


Be sure to check out the post about our Tangled Party food and games.

You can also check out our Pirate Birthday Party and Art Birthday Party for more ideas!

image signature
Follow me on Facebook


February 27, 2014

Our Tangled Rapunzel Birthday Party


We had a fabulous time last week throwing a Tangled Rapunzel Birthday Party for my daughter who just turned 5 years old!  She loves that cute movie, and I admit I do too!

After a bit of internet research for inspiration, we put together a ton of cute and inexpensive decorations, food and games all with the Tangled theme!


Our living room was decorated to the max!  I made a purple pennant banner with the golden sun on it to hang from the twine in the window.  I simply traced and cut the suns from construction paper and glued them on to purple construction paper triangles.

I hung twinkle lights across the ceiling, and taped on yellow balloon "lanterns" that reflected the lights well. With a large purple marker I quickly drew the Tangled sun on the balloons.  I've had fun stringing lights for the girls' birthday parties.  It is fairly easy, and they LOVE it!

The hair was hysterical.  I purchased a few yellow plastic rectangular tablecloths from the dollar store.  Then, cut each tablecloth into six long strips.  The girls and I took 3 strips, tied a knot in the end, and braided them loosely together.  When we got to the end I tied three more strips on the ends of the first ones and we continued braiding.
The girls said they felt like the little girls in the movie who hop around braiding Rapunzel's hair :)

We ended up with one seriously long braid!  Then I hot glued some pink and purple dollar store flowers on, and we were able to string Rapunzel's hair all over the house!

We used a lot of purple and yellow for our decorations.  We also used a lot of frying pans (who knew, right??)

These little plastic plates have a plastic knife hot glued on the back so they kids could eat off of "frying pans."


When the guests arrived, they started painting their paper lanterns with watercolors.  I drew the design onto white construction paper, and it was a great activity for the kids to do while everyone was arriving.


When they were finished, I taped the short ends together, punched a couple of holes in the top, and tied a ribbon.


We had fun playing a few traditional games...
Pin the frying pan on Flynn Rider was funny.  I free-handed this Wanted poster with sharpie, and cut out black frying pans from construction paper.


My daughter has always wanted a pinata, and when I saw this idea, I totally went for it.


The girls had fun hitting Flynn with a frying pan, but ultimately I had to take it down and bust it open for them.  The cardboard box was pretty much impossible to break :)


One of the best games we played was this "Mother Gothel" game.

I printed off four pictures representing locations from the movie.  I then taped them up in the four corners of the room.

One child was Mother Gothel and closed her eyes and sat in the "tower" - aka the rug in the middle of the room.  All the other kids "hid" in one of the four locations by standing by the signs I had taped up.  When Mother Gothel was done counting, everyone was very quiet and she had to call out a location, without looking.  If there were any "Rapunzels" in that place, they were stuck in the tower with her, and sat on the rug.  Then, she closed her eyes and counted again, everyone switched locations, and again Mother Gothel would guess to try to catch more Rapunzels.  When there was only one child left who hadn't been caught, she was the winner, and got to be the next Mother Gothel.  We played that one quite a few times!


We didn't have a full meal, but we had a few snacks and cupcakes.  The tower cupcakes were my yummy vanilla cake recipe.  I stacked a few chocolate covered Ritz crackers on top (using frosting as mortar) and a sugar cookie cone on top of those to make a tower.  Then, I piped some yellow frosting all around to look like hair, and put tiny colored candy flowers in the hair.  They turned out cute and were pretty fast to make.


This Golden Flower Punch was yummy, and I was informed by more than one child that I was the best juice maker ever! :)  This is a family recipe that my Grandma used to make for me, which we call Slushy Drink - and it is very fun for a party.  Click the link for the recipe!


A little jello, a clementine section and a toothpick golden sun flag make another easy snack.  (Set out in a frying pan, as you can see)

I also took pizza dough (the frozen balls of dough you can buy in the deli section of the store work great!) and braided strips together to make Braided Hair Breadsticks.  I topped them with a brushing of olive oil, a sprinkle of parmesan cheese and mozzarella cheese, and some oregano.  Then baked at 400 degrees for 15-20 minutes.  They were great!


In an attempt to throw in something healthy ;)  we had Apples for Maximus - and to their credit, all the girls ate some slices!


We also let them decorate flower shaped sugar cookies with yellow frosting and toppings as Golden Flower cookies.  They took them home in little ziplock bags, and had a fun time decorating.


I always like to get pictures of my birthday girls with their friends.  After we wrapped my older daughter in TP to make her a snowman at her last party, I wanted to do something similar for our Rapunzel party.  Yellow streamers were perfect!


Turns out, all the girls wanted to be wrapped up - and it was pretty fun getting a picture of them all "Tangled"...


Plus, it was fun to tear it all off!


All in all, the Tangled Rapunzel Party was a huge success!!  And I have a very happy little 5 year old...


Come check out this post to see our Tangled invitations, party favors and thank you notes!


image signature
Follow me on Facebook


February 6, 2014

Finished Zig Zag Scrap Quilt


This summer, I finished my first ever quilt!  At least, I finished the top ;)  Once it was quilted it took me a while to finish the binding - and so here I am finally posting about my scrappy zig zag quilt...


I know there are many of you out there, just like me, saving all those little tiny scraps of fabric - knowing that some day you will find a use for them.  Am I right??  They are impossible to manage in the fabric bin, but it is amazing how often I'll find a use for a strip of fabric here or there.
Well, at some point, when you've accumulated more scraps than you can handle, try making one of these stash buster zig zag quilts!!  Each piece of fabric is only a couple inches wide and a few inches long, so you can really utilize those tiny scraps!