Recently, our family moved from the Northeast to the Northwest - and it has been an adventure! In a whirlwind decision we packed up and moved our family in three short weeks - and we're still settling in.
Part of the deal with moving of course, is clearing out (I know lots of people who consider moving the perfect time to do a household purge, and we were no different).
Some of the things that have stuck with us though, are the sentimental items my husband and I have had since childhood. Including a whole bunch of t-shirts.
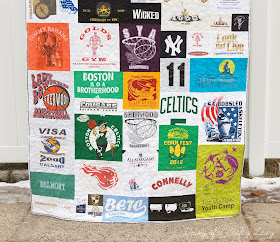
T-shirts are one of those things that seem to accumulate quickly, and often rotate in the wardrobe. When I started pulling out a bunch of shirts from my childhood I decided I didn't want them sitting, unworn and forgotten in a tub any longer. I took the plunge and cut them all up to make myself something useful - a sweet t-shirt quilt!
The process was a bit difficult, but I'm going to attempt to document how I made it, in case you'd like to make your own!
I started out by cutting the logo/picture/patch/whateveryou'vegot from each t-shirt, leaving as much plain t-shirt border to work with as I could. You can see below how much white space I left around the picture.
If there was something small on the arm or on the back, I cut that out too...
Before trimming anything, I ironed interfacing onto the back of each piece. This does make the whole quilt a little bit more stiff, but it is SO much easier to work with! After I had the interfacing on, I didn't have to worry about the t-shirt material stretching while I cut it or sewed it. I'm glad I used it!
I had the hardest time picking out the interfacing. If you've ever tried to purchase it at the fabric store, you'll know what I'm talking about. They had about 30 bolts and I sat staring at them for about 30 minutes. Ultimately, I chose something that felt like medium weight and hoped for the best.
It was Pellon, 950F, Apparel Interfacing. It worked great :)
Update: I'm working on another and this time I picked 906F Fusible Sheerweight, also by Pellon. It is not quite as thick, but still keeps the fabric from stretching while I sew it. I think I like it better!
Now comes the interesting part.
Since I didn't make all my squares uniform size, I had to do a lot of math. A LOT. My brain hurts just thinking about it.
Below, you can see some of the papers I used to keep everything organized. The large paper on the bottom listed every single piece of t-shirt individually, and information about it.
The paper on top was a pattern I made in power-point. I zoomed out to 10% and made square shapes on the computer that were the actual size of the piece of t-shirt I was working with.
Here's the process, from the very beginning:
1) For each t-shirt piece:
- Use a numbered list
- Next to each number, write some identifying information about the t-shirt piece so you'll know which is which, then
- Measure the t-shirt piece and write down the minimum and maximum dimensions it could be cut to. Make sure, when writing the maximum or minimum size it could be, that you consider the seam allowance (so leave at least a 1/2" border when measuring the maximum size).
2) Using powerpoint if you have it (could be done in Word too), use the shape tool to make rectangles. I numbered each rectangle on the computer to correspond to a number on the list.
3) Starting in a corner, arrange the rectangles. Check your numbered list to size the rectangles based on the t-shirts you have. Adjust the size of the rectangles on the computer to make them fit together, and fit the size t-shirt pieces you have.
(Warning, this took me a LONG time). It requires checking your numbered list for a t-shirt the size you need. Then, making them fit - moving things around when you run out of pieces small enough to fit. You could supplement with small blank t-shirt squares if you absolutely have to fill a hole. But I found that the small logos I took off of the arms worked really well to fill in the tiny gaps. Make a check mark next to the number on the list once you have used that t-shirt in your pattern.
Below, you can see a screen shot of my powerpoint pattern. To help, I even made rectangles the same color as the t-shirts, so I could make sure I was arranging the colors in a way I liked.
4) Once I had my pattern finished, as seen below, I re-wrote my numbered list and wrote down the final dimensions of each piece based on the size of the rectangle in powerpoint. Remember, I made each rectangle to scale, so when I clicked on one, I could see the exact size (for example: #5 was 11" x 13").
I also checked my work multiple times! I made sure that if I added up the width across the top, it matched each "row" of squares all the way down the quilt. Same with the "columns." I put those words in quotes because there are no exact rows and columns. So I went across or down in the best way I could to make sure the width always added up the same and the length always added up the same. It is easy to be off by 1/2" when trying to align the squares in powerpoint. (See where the math can start to hurt your head? You just wait...)
Here's another picture of a t-shirt quilt pattern I made later. I typed in the dimensions as well, which helped!
Here is the really important math step!!
5) Take your numbered list (which should show the size of each t-shirt square) and make a new column to add in seam allowance!!! The powerpoint pattern does not take seam allowance into account. EVERY SQUARE needs to have seam allowance added to the length and width. I decided to use exactly 1/2" seam allowance, so I added 1" to the length and 1" to the width of every square.
Here's an example of my list:
Then, you start trimming your t-shirt pieces. Find piece #1, and cut it to the correct size (the size with the seam allowance factored in), and do this for all the pieces.
6) Once all the pieces were trimmed with the correct seam allowance, it was time to sew them all together. Carefully using my pattern (which I printed out using a screen shot) I started sewing small sections together.
Take a look at my powerpoint pattern again:
Then I sewed #26 and #26b together, and added it to the #5 piece, which was sewn to the other 3 pieces. (you can see what I mean below)
If you look carefully, do you see the process?
Next came #4 with #24. Then added those to #6.
Next #40 with #45. Then added to #43. Then added to #42. Etc. etc.
Small section after small section I sewed together, careful to use the exact 1/2" seam allowance I had allotted myself. Then, I sewed those smaller sections together to make bigger sections. Almost the entire quilt I was able to find exact sections to sew together (meaning I could match up two entire edges perfectly). Only once did I have to sew an intersecting piece half way through another square. It required me to think it through, but if I was careful I could almost always sew full pieces together.
Here is the first half of the quilt sewn together...
And the other half...
And finally, here is the completed quilt!
We used a simple, swirly pattern to quilt it, so as not to detract from the t-shirt designs. I used a flannel for the backing, which makes it soft and warm. I did use the thin, natural cotton batting in between the tshirt top layer and the flannel backing layer. The quilting machine could handle all those thick layers - but just barely :)
I am completely in love with the way it turned out! It represents many wonderful memories, and there is even a t-shirt all the way back to my elementary school days!
I have seen quite a few t-shirt quilts, and I have always admired them. It was a huge challenge to have all different size squares, but I love having everything packed together, cropped tightly, and I love that this quilt is so unique! No one will ever have another one like it, which makes it that much more special. My husband has already started gathering his t-shirts so that I can make another - and I have to admit, despite the hard work (and the endless math), the idea of making another one sounds fun ;)

Follow me on Instagram @ diaryofacraftylady
Follow me on Facebook


