Pages

April 5, 2011

Colorful Fabric Easter Eggs


I wanted a nice, simple project to complete this weekend, and since Easter is coming, I decided to make myself a little decoration.  I have had these fabric Easter eggs on my to-do list for a long time.  They are so bright and cheery!  They are also very simple to make!
The tutorial can be found here at Retro Mama.  They would go great with some sort of Easter mantle.  Too bad I don't have one of those:)  But with a bit of subway art next to them, and some other Easter themed items, these would be a great addition!


image signature

April 2, 2011

Purse Boggle

Well, to start off, I have to say - this is another one of those posts where I have an
east coast vs. west coast battle going on
:)
  I grew up calling my bag a "purse" in the west; but here in the east, it is called a "pocket book"
Why can't we all just get along?! (hehe JK.)
I could probably make a long list of these types of discrepancies. 

We already discussed "pop" vs. "soda"
and now I have "purse" vs. "pocket book"
I need to figure out how I can fit "cart" vs. "carriage"
or "sprinkles" vs. "jimmies" into a post....

Well anyways!
The other day I was at a social event (rare for me), and we played a game called "Purse Boggle"
We had a few minutes to write down everything in our purse (the more unique the better).  Then, we compared our list to everyone else's, and whoever had the most items that NO ONE ELSE had - Won!
Well, I didn't win (although I did have plastic page protectors in my purse, which I really thought was going to get me extra points) - but I did start to think about all the things I have in my purse, and how many of them I have made!
So, I thought it would be fun to recap all of the tutorials I have posted - about things you can make from fabric that help organize that purse/pocket book/clutch/tote/carpet bag of yours. 


1. The Check Book Cover is so much prettier than the plain brown or black ones you get from the bank!  Checks are easy to find with this beauty!

2. This little Earphone Pouch only measures about 3.5" square - but it is SO USEFUL!  If you have an iPhone, iPod, or MP3 player that you carry around with you - you have to have one of these!  I have an iPhone, so my earphones are also my hands free set for talking on the phone.  I always want them in my purse - but I would be so sad if they got ruined with cracker crumbs, or twisted and yanked...
This little pouch velcros all the way across the top so my earphones stay clean, untangled, and easy to find!

3. The Card Holder is a new addition to my purse, and boy do I love it!  First of all, my wallet was always bulging with punch cards, gift cards, point cards...and that was frustrating.  Not to mention hard to sift through.  This card holder solves my problem!  And, I don't even have that many.  My mom needed more than one - so she can separate the types of cards - like restaurant cards separate from the gift cards - that sort of thing!  Make life easy on yourself with one of these!

4. The Tissue Holder is what I have had in my purse the longest - and it has a dear place in my heart.  LoL.  There are countless times when my kids (or other kids that happen to be near me) need a tissue!  Eww.  And the worst was when, before I had this holder, the tissues were crumpled, and filled with crumbs (dang those crumbs!), and hard to find in a split second.  Now my pocket tissues stay in their holder, stay clean until they get used, and are easy to find!  THANK YOU!

I have also made a Coffee Cozy for friends - and if I drank coffee, one of those would live in my purse.
I have even made a myself a Jean Purse - and when I was using that, my entire bag and practically all the contents were handmade!

On top of that I have made adornments for my purse - like the Pop Can Key Chain

Quite crazy how many purse related things I have crafted in my life.  And I have no doubt that there will be more.  Maybe sometime I will even show you all the things I have made for my diaper bag! ;)

image signature
P.S. You can find a few of these things for sale in my etsy shop!

March 30, 2011

Colorful Fabric Shelf Liners


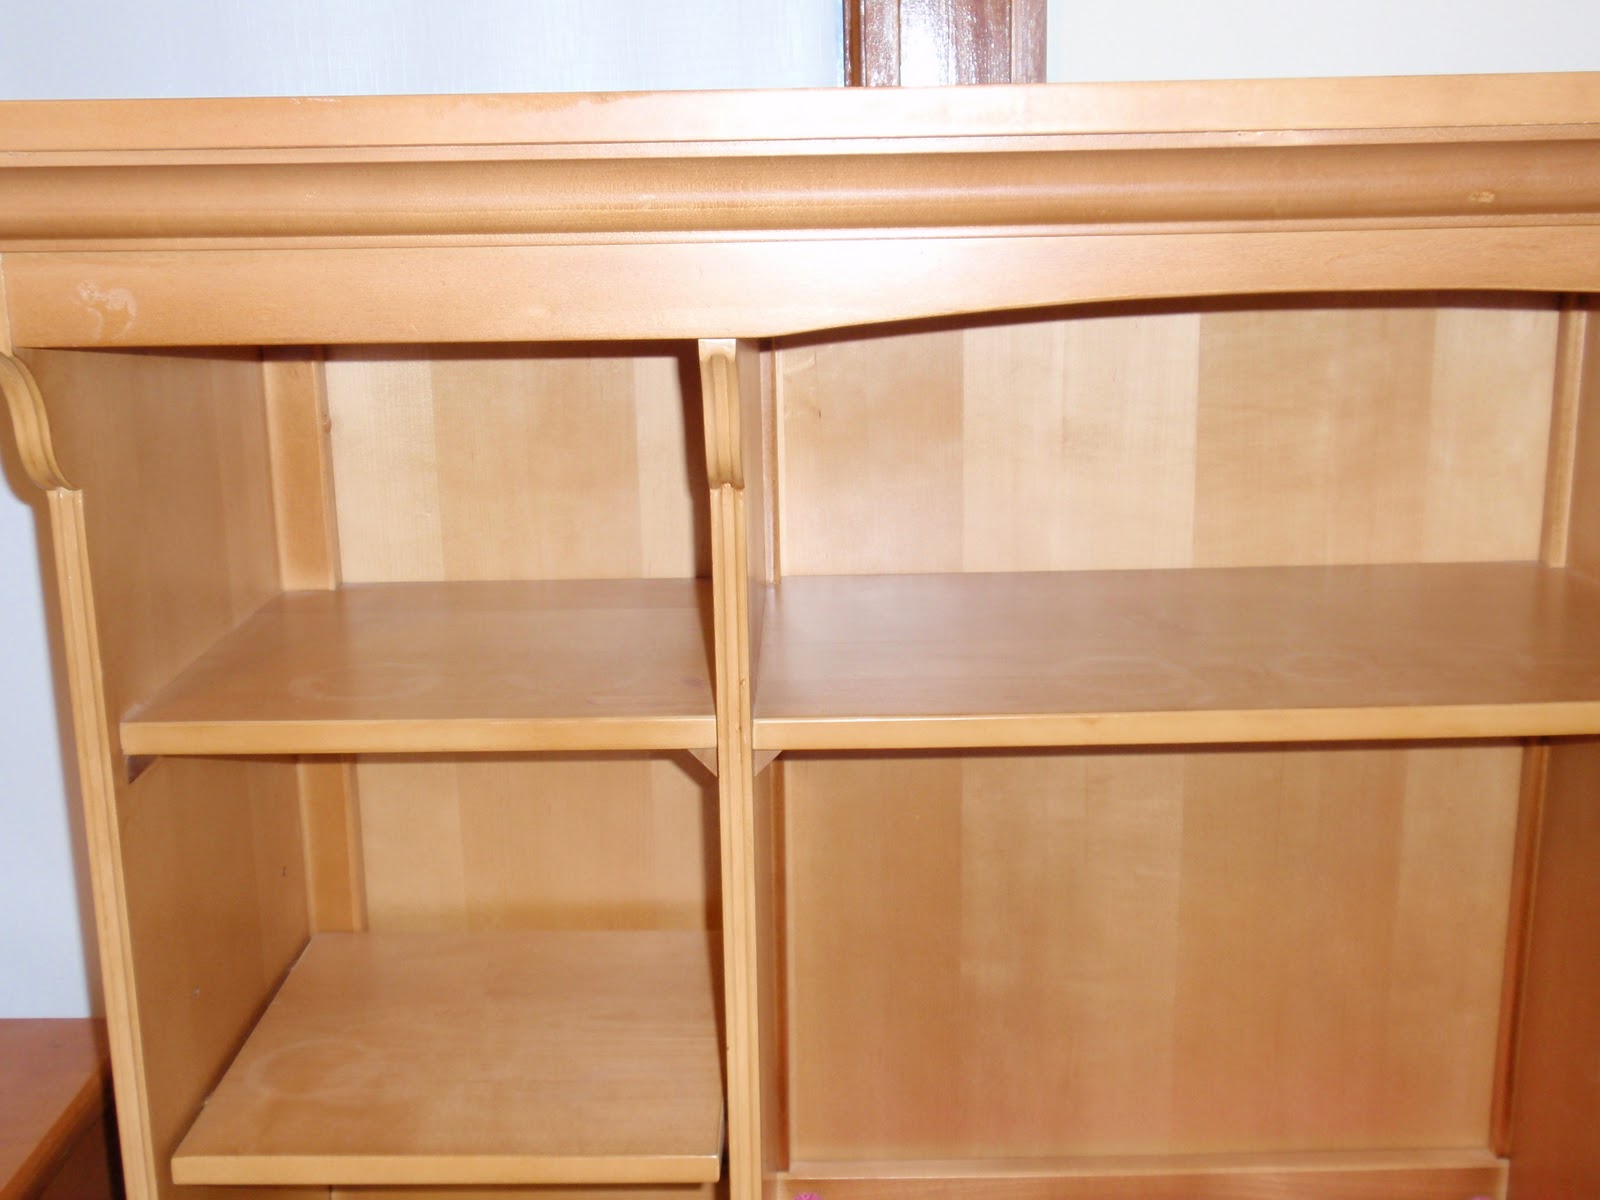
We were given this neat big girl bed for my daughter - and she loves it.  It is taller than her, and she can store all her books in the shelves of the headboard.
Since it is a hand-me-down, there are some water rings, and scuffs along the shelves.  Not that big of a deal, but something I have been thinking about covering. 
My girls' room is also very colorful, and I thought it would be nice to reflect the color in this big furniture piece in the room as well. 
I bought a few foam boards from the craft store.  They are made by Elmers, and cost just a couple dollars each.  They are kindof like cardboard, but have a foamy middle. 

I measured and cut the boards to fit my shelves. This headboard has small square shelves, but you could do this with a traditional bookshelf with long horizontal shelves - the foam boards come in rather large pieces.


For each piece of foam board, I cut a piece of fabric large enough to have a 2" border around the entire board.  I also ironed the fabric so that no wrinkles would show. 
Using my glue gun, I glued one side of fabric down to the back of the board, and making sure the fabric was taut, I glued the opposite side fabric down. 
To glue the remaining two sides, I folded the corners like I was wrapping a present, and used glue to secure them. 
 Then, I pulled the fabric taut and glued those sides down. 
 After all 4 sides are glued down, it looks like this.  Very easy!!


I did not secure the boards to the shelves at all, they are just loose, but the books hold them down.  That also means that they aren't permanent - so they can be changed or removed anytime - and I didn't ruin the headboard in any way. 

The added color is perfect for this room, and I am so pleased with the result!


image signature

Check out these parties I often link up to!

Come visit me at Lolly Jane Boutique today!


Here is one of the things I have been working on lately! 
Feel free to come visit me over at Lolly Jane Boutique for the full tutorial on this distressed, vintage style Washroom sign!

image signature

March 26, 2011

I'm in the running for Best of March 2011 at Saturday Mornings! You can vote!


Hi dear bloggy friends!
The blog Saturday Mornings has a fun contest to pick a "Best of" for each month of the year.
I was nominated for March for my Happy Birthday Ruffle Pennant Banner!! (My sweet little daughter thinks I'm the best too:) )

Photobucket

If you feel like hopping over to vote - that would make my day:)  In fact, you can apparently vote every day, if you want!
There are some great projects listed over there on Saturday Mornings, and in case you didn't already know, they have a weekly linky list that you can join too!

I hope you are all having a WONDERFUL weekend!  More projects from my weekend coming soon!
I'm also working on my giveaway winner's pop can key chain....it's coming along Allison!
I just wanted you all to see how cool this looks in Dr. Pepper too!


image signature

March 24, 2011

Vintage Style Painted Cafe Sign

My girlies have a cute little kids table in the kitchen that they sit and eat at.  Surprisingly, above this cute little table has been a blank wall!  (The only blank wall in the house:) )  I've had the idea for a while to make a couple of vintage looking signs for the wall, incorporating things that have to do with my kids. 

This is the first one, and I love it!  It hangs above my older daughter's chair, and is totally her.  Her nickname is in the title of the diner, and her favorite meal is breakfast
She would eat pancakes, waffles or cereal for every meal if I let her!

A couple of weekends ago, we also went to a Maple Sugaring Farm here in New England, which was a blast!  We watched the maple sugar being made, and saw all the taps in the trees where the sap flows from.  Hanging to the right of the sign are 2 used maple sugaring taps - which I purchased in the farm's gift shop.  They were just the perfect touch I was hoping for!  They look old, and they complement the theme of the sign.  Score!

So,  do you want to know how I made this sign??  Get comfortable - because there are quite a few steps:)  Still, I think this project is very manageable. 

At the hardware store, they sell wood by the linear foot.  This means that you don't have to buy the entire board if you don't want to.  So, I had them cut me a piece of 12" wide wood to 18" long, and I only had to pay for 18"!  Perfect:

I started by painting a base coat.  I chose antique white, and some shades of orange, and spread them over the entire top and sides of the board.  Throughout this process, I was not very careful with making the coats even, because it helped provide the vintage look I was going for.  I used a foam brush to apply the acrylic paint, and below shows a picture of my first coat. 

When my 1st coat was dry, I added vinyl lettering to anything that I wanted to remain this white color by the very end.  It served as a barrier for any paint that I would put on over it. 
If you don't have a way to get vinyl lettering, you can certainly wait until the end to paint all your words on, and just do them by hand.  You will still want to paint multiple layers of base paint in a variety of colors though. 

So, my second coat was bright blue.  Again, you can see that I did not put on a heavy coat, nor did I try to make it even. 

When the 2nd coat was dry, I applied vinyl strips to the parts that I wanted to remain blue.  Here I wanted two strips on the sides to stay blue, and a few "stars" (aka asterisk).  This could have been done with masking tape or contact paper as well (since strips are easy to cut by hand).

My third coat was this dark brown.  I used a variety of brown and red/brown acrylic paint. 

When the 3rd coat was dry, I applied vinyl to everything I wanted to remain brown.  In this case, the shape of a syrup bottle. 

Finally, I added my 4th and final coat of paint, which is the color that my sign would finish as.  This color is darker than the antique white that I used at the beginning, so that the words that were in antique white would still stand out. 

 I wanted a fun retro shape for my logo, so I traced a this funky thing in the middle...

...and painted it in with light blue. 

I considered painting the words "Jossy's Diner" by hand, using a transfer paper method (just like I did in this post - no vinyl required!).  Instead, I made another stencil:

And painted blue inside:

Now comes the fun part...getting to pull of the vinyl. 
I wanted to jazz up the syrup bottle a little bit, so I pulled off the vinyl shape, but left the vinyl words underneath - to be pulled off later.  I didn't want those words to be painted over at all, so that vinyl didn't come off until the very end. 

Again, I could have painted the details by hand, but I was going crazy with my Silhouette by this point, and decided to mask off each section with vinyl. 

I painted a silver handle, and a maple leaf in the middle of the bottle. 

And since that was the LAST bit of painting, I peeled off ALL THE VINYL, and was left with THIS!!!!  Coooooool:)

I took a 120 grit piece of sandpaper to it, and went to town (strategically).  As I sanded, the color from the coats of paint underneath peeked through, and made it look even more old and worn.  
I was 99% satisfied, but not quite happy with the fact that the "Waffles" and "Pancakes" section was hard to read. 

 So, I painted over those parts with the brown color....and roughed it up again:)

I attached some hanging hardware, and stepped back to look at my handiwork.  I LOVE IT!
I am going to make another one for above my younger daughter's chair at some point - so stay tuned for that! 
Now, I know this is a very detailed sign, but this same technique can be used in a much simpler format.  In fact - pretty soon, I plan to post about it :)


image signature


March 22, 2011

Pop Can Key Chain Giveaway WINNER!

Thank you to all who entered my follower giveaway this past week!
The winner of the pop can key chain of their choice is #21

Congratulations to
Allison @ Room Mom 101 who said...


What a neat idea! Love it! I am heading over to check out your teacher appreciation craftys next. I would love to win this...I would have to pick Dr. Pepper. Mmmm! Thanks!
Allison
www.room-mom101.blogspot.com

Yay Allison!  I'll be emailing you shortly for more information.

Thank you to all who entered, and for all you lovely followers and commenters!


image signature

March 20, 2011

Freezer Paper Stencil T-SHIRTS


This project has definitely been on my to-do list for a while now.
Every since I got my silhouette, I wanted to try making my own t-shirts.  Not because I couldn't buy cute t-shirts for cheap at places like Target - but I wanted to personalize them.
I found brand new Hanes t-shirts at Goodwill for 50 cents each, and so I grabbed a bunch, knowing that if I messed up, I wouldn't be mad that I had spent a whole bunch of money on a shirt:)
I also got a few different colors of fabric paint from the craft store, and already had the freezer paper on hand from other projects I had done.
So, I first saw the "Gramma's Gonna Snap" saying that I put on my shirt here at I am Momma Hear me Roar.  I thought it was so funny - because this embodies so many people I know - not the least of which being my dear mom.  She can easily take 1000 pictures of her grandkids during a two week long visit!  She always has a camera in easy reach:)  We have gotten some really wonderful pictures that way, but it is still a little funny.

So, throughout the process of making these shirts, I discovered a new feature in the Silhouette software - and that is the trace option
I wasn't planning on giving a full tutorial here on the blog - but if I get enough requests for a tutorial on this, I will write one.  Basically, you can pick any clip art that you can find on the web, and have the Silhouette software trace it for you.  From there, you can edit each little point, to make the lines connect and move in any way that you want, until the tracing is exactly as you want it.
It is really amazing!

So, it took me a while (maybe a half an hour or so), but I got this great camera shape, perfect for the t-shirt I wanted to make!
I had the silhouette cut it out in freezer paper, and ironed it down to the shirt.  (For those of you who do have Silhouettes, I had to use my extra sticky cutting mat, and press the freezer paper down really well - shiny side down- because the pieces it is cutting are so small, that it will crinkle and rip the paper as it cuts if it is not firmly on the cutting mat).
I also chose a fun font, and ironed that on as well.  This created a stencil - a barrier for my fabric paint. 
Carefully paint inside the lines...
And when the paint dries, and you peel away the freezer paper, you have an AMAZING picture!  My family pointed out that it looks like it was screen printed.  It is very crisp and clear, and AWESOME!

So, since the first try was SUCH a sucess, I made a few more :)
This one is for my little nephew.  His real last name is "Tucker", and so I thought it was a funny play on words to write "Trucker", and have a picture of a dump truck. 
As you can see, I used sharp tweezers to place the pieces of the stencil, and had a sharp pair of scissors on hand in case I needed to trim anything.  The ironing must be done carefully, tiny piece by tiny piece. 
This time, I used a few different colors of paint, and it turned out really cute!
Of course, my 4 year old daughter was watching me paint all this time, and she LOVES to paint.  After begging and begging me to help, I decided that it would be kindof fun to let her make her own t-shirt. 
This time, I did it differently though.  Instead of making her stay inside the lines, I made a stencil that would leave the image the same color as the shirt, so that she could paint outside the lines - which was, of course, easier for her!

I helped finish it off, to make sure that there was an even coat of paint around the stencil, but she had a GREAT time making her own shirt.
And I added a few rhinestones to make it sparkle a little. (They do make glittery fabric paint, which would have been much better for this saying if I had known in advance I was going to do it.)

And since I was on such a roll, I had to make a "Momma's Gonna Snap" shirt for myself!


As I said, it is so fun to personalize a shirt - and freezer paper is such an easy (and inexpensive!) way to make a stencil.  You can make a shirt with your child's nickname, or as a gift for a birthday. 
You can also go wild with embellishments on a t-shirt that you have painted - with buttons, or ribbon, or flowers....the possibilities are endless!!

image signature