Pages

September 30, 2012

Bread Clip Monster Garland


Have you seen this darling idea from Crafts By Amanda before?
When I saw it a while back, I started saving all my bread clips in a jar, and just decided to make a silly little Halloween decoration for my kids' room with them....


The bread clips themselves came in all these different colors, so I did not have to paint the entire bread clip. 

I just used my stylist to add dots and lines with acrylic paint.  A word to make this go a bit faster: start with the eyes.  Take white paint, and paint eyes on every single bread clip.  Then, add the other patterns around them.  I think it is easier that way - especially when making these in bulk!


I hot glued them onto string to make them into a garland. 
I hung this on a blank wall to take some pictures, but I think I will put it in the girls' room, maybe on the end of their bunk bed.  They think it is funny, and love all the colors.  My daughter's favorite is Mr. and Mrs. Frankenstein.  Can you spot them?  :)
image signature

September 29, 2012

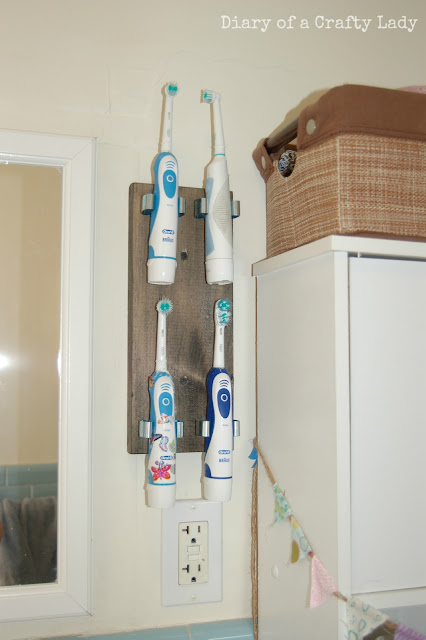
Electric Toothbrush Holder


For a while now, our family has used electric toothbrushes - and we all really like them.  These are just the inexpensive ones you can get at the grocery store, but they do seem to make our dental checkups go better :)
The problem is that they are bulky - and hard to store. 
We've had them on the edge of the sink....and they are easy to knock over (Eww if they fall on the floor!  And actually replacement brush heads are rather spendy...) and it is not quite as quick as I would like to clean the sink when I have to move these guys around.


Solution!  I cut a piece of scrap board and screwed on 4 broom clips!  (As the name indicates, they are typically used to hold a broom or mop on the wall by the handle.)


The broom clips hold the electric toothbrushes perfectly!  And now they are secure on the wall (so they won't fall and get all dirty), and they are off the counter and out of the way.  Hallelujah! 

It's the little things in life, right? :)

image signature

September 23, 2012

Quick Halloween Projects 2012


Each year I add on a little bit to my existing holiday decor.  I have some Halloween decorations already that I love (check out this post here for a recap of Halloween projects from the past). 

All of these projects I did in just one day (it was my birthday, so I allowed myself to completely check out and craft all day :) )
Even so, they are all quick and manageable in short amounts of time - which is great for feeling accomplished!

I made a few different pillow covers.  I love changing out the covers for the holidays - and this is a really inexpensive and quick way to make a room festive!  I used leftover canvas from this project, and with freezer paper stencils and black paint, these pillow covers were born...

The pillows above were inspired by these ones at Chapman Place Blog.  Darling.  I intentionally sewed these with raw edges - I figured they looked festive that way.  So, they are simply 3 pieces of fabric, a large front piece, and 2 slightly smaller back pieces, sewn into a pocket.  I made these ones in a similar style - if you want to see more detail. 

This pillow below is also sewn pocket style, but turned right side out so that the raw seams aren't showing.  This was inspired by the printable found here.  I used the trace feature in my Silhouette program to make another freezer paper stencil.


This darling printable came from Less Cake More Frosting.  I sized it to fit over the glass of an existing frame in my house.  I simply taped it over the glass and left it hanging where it is normally.  There are tons of free Halloween Printables out there - and if you use them to cover up existing pictures in your house, it is fast for decorating. 

I typed up the saying below after seeing this pin.  Pretty funny.


The bats are simply black vinyl cut with the Silhouette and stuck on the light fixture like regular stickers.  This idea came from this post at Crap I've Made.   (Yes, all these project inspirations are on my Halloween Pinterest Board - are you sensing my love for Pinterest:)?)


And finally, this old frame got new spooky life with neon spiders and a twine spider web.  I saw a web frame here (which would also be darling as a door "wreath") and used the idea to fill a blank space in my dining room.  A little hot glue made this project fast.  If I had had white string around, I would have used that, but all these projects were done with materials I had around the house - so twine it was. 


I hope you are all enjoying the coming Halloween season - and if you feel like changing up your decor a bit - try one of these fun projects.  It'll be faster than saying 'BOO!' ;)

image signature

September 20, 2012

Chalkboard Medicine Cabinet


I have a quart of chalkboard paint that I keep finding little uses for :)
This project was inspired by this picture here.

This is a fun addition to the bathroom, and one that you only see when the door is open.

I taped off the inner section of the door and painted on a few coats of chalkboard paint. 
Then, I grabbed a chalkboard bistro pen at the craft store to make writing easier - and it is fun to mix up the little notes that my family sees when they open the cabinet door!
Do you have quick projects you have been using chalkboard paint for?
image signature

September 16, 2012

Halloween Projects of the Past

Today was my birthday (woohoo!) and my present to myself was to put up my Halloween decorations :)  It was fun, and festive, and I love getting ready for fall!
I made a few new things today - but since I haven't taken pictures yet, I thought I would do a recap of some of my favorite Halloween projects from past years...


Made this Spider Clock with an old clock face, vinyl spider webs and plastic spiders.


This Countdown Block Calendar was a raw wood calendar that I painted and embellished.


My Directional Wooden Post Sign is fun for outdoor decor - and let me use my beloved mitre saw :)


I get a chuckle every time I pass this Broom Parking Sign.  I have a Silhouette I could use now, but at the time I made this, I painted these words by hand.  Click the link to see how.


These simple Burlap Wrapped Glass Silhouettes add a lot of Halloween spirit to the room!


A family favorite, click here for a tutorial for Smashed Wicked Witch Legs.


This Felt Trick or Treat Bag was my first.
I've also made a Pizza Planet bag, an Etch-A-Sketch bag, and I'm sure I'll be making new ones to match our theme this year - so stay tuned!  This is a fun way to personalize your child's costume!

Hope you all enjoy getting into the Halloween spirit! 


image signature

September 10, 2012

School Clothes Door Hanger


So...Kindergarten.  Tomorrow is the big day :)  We are all excited (well, most of us).  However, I have a feeling we will all be adjusting to the earlier wake time.  We like to sleep in around this house!

I have been trying to think of a few things that I hope will make the morning routine faster.  One of those things is picking out clothes the night before.  I'm sure quite a few parents do this.

My husband used to call this his "clothes witch" because he would lay his clothes out on the floor, and he thought it looked like a witch :)
Since we don't really have any room on the floor - I was hoping to keep the clothes hanging.

There was already a hook installed at the top on the back of the door - so I figured I could somehow hang the clothes from this.  The trick was getting the hangers low enough for my 5 year old to reach.

I grabbed this jute webbing I've had around the house, and cut a long strip.
Using my button whole maker on my sewing machine, I made a button whole at the top, to hang on the hook, and then 2 toward the bottom, to hang 1 shirt and 1 pants hanger...


I also had a little clip (you could use a safety pin, a chip clip - whatever you have) which I sewed on to the very bottom to hold socks.

Such an easy fix - and so convenient!!  Now, my daughter can have clothes picked out and hanging on the door, ready to put on as soon as she wakes up!  Depending on how it goes, I might add a clip for a headband, or other hair stuff.

Here's hoping that breakfast, and lunch making, and brushing teeth and every other thing goes as smoothly :)

image signature

September 3, 2012

Sprucing up the Kitchen Crate


I made this kitchen crate a while back for contained storage over my fridge - and I LOVE it!  It hides the cereal boxes, and keeps them from falling on the floor.

I had gotten a bit tired of the canvas cover I made for it though, so I decided to make a new one.  I used a freezer paper stencil, and fabric paint. 
If you want to know about using freezer paper as a stencil, you can check out my


I also decided to add a bit of side storage for my measuring cups.  I nailed a couple of boards to the side of the crate, and used nails as pegs for the cups. 
It is so convenient to have them on the side, out of the drawer that they kept getting stuck in!

It is nice to do these quick projects to change up a space a little bit :)

image signature