Pages

December 30, 2011

Top 10 of 2011

So, I have never done one of these posts before - but I do enjoy seeing these from other people.  It is amazing to see all their best projects in a row.  And I have been blogging long enough now that I actually have a full year to choose from :)
So, here are my top 10 from 2011 (mostly based on google analytics and pinterest pins). 


Thanks for stopping by, and hope you all have a fulfilling and wonderful new year!!


image signature

December 27, 2011

Handmade Christmas Presents 2011


I hope you all had a wonderful holiday!! 
I have had such a fun, relaxing time the past few days with my family -- baking, watching movies, web chatting with relatives, opening presents....I am a lucky lady!
Now that Christmas is over, I can post about a few gifts I made for family and friends :)

This was a hot item this year :)  My sister made a few of these for her extended family, and I made a couple for mine.  I had made myself a Roman Numeral Painted Sign a few months ago (you can find the tutorial here), and my sister had the brilliant idea to add the family name over the wedding date
She also made hers with spray paint, which I have never done before (I always use acrylic paint).  So, I made this sign with spray paint.  It is faster, but there are two things that make it harder to use (in my opinion) 1) There is no way to touch it up - so if you accidentally peel up some paint when the vinyl is getting pulled off, you are in trouble!  2) Spray paint does not sand down well - so if you want to distress your sign, it is easier to distress acrylic paint.  So, using spray paint is great if you are impatient, but be careful! ;)


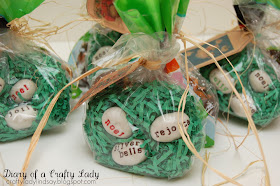
I  made myself a set of Clay Rock Magnets a while back (the tutorial can be found here), and I love using them.  They are probably the favorite magnets I have on my fridge right now (and I have quite a few...I love making magnets!)
This year, I made a bunch with holiday themes, and gave little sets of them to friends, co-workers and neighbors.  I coupled them with a bag of chocolate dipped pretzels.  It was great because the  girls helped me make both the magnets and the pretzels, and they were easy to mass produce.


Years ago, I made a "Relatives Book" for my daughter - just pictures of our extended family - often with her in the picture - glued onto pages of a flip book.  She has loved it, but over the years it has taken a serious beating.  Pages have been ripped or torn out, and it has really been strewn all over the house.
When I saw this idea, to put pictures on CDs, I loved it!!  CDs don't rip or tear, they are a great size, and we had a bunch of old CDs around the house that we could use. 


I printed a bunch of pictures onto plain printer paper, traced around them with a CD, cut them out, and used spray adhesive to stick the pictures to the actual CD.  I put a picture on each side of the CD, and then used a power drill to make a small hole for the book ring to go through. 


This idea would be great for a variety of things - Alphabet Book, US Presidents, LDS prophets, Holidays, - and they stand up to babies!! ;)


The big surprise for Christmas this year: we are taking the girls to Disney World in a couple of months!!  I wanted some tangible way to tell them we were going, so I made these Minnie Mouse Ear Headbands to give them, along with an explanation of where they could wear them in a few months.  They are so excited - and now we'll be able to take the headbands with us :)  I found a great tutorial here for making these cute things.  (I didn't have foam around, like the tutorial said, so I used a disposable plastic plate to make the ears stand up.  Worked GREAT!) 


Don't those faces just tell it all?  We are excited! 

I hope you all have a relaxing and wonderful end of year.  I love being able to share all my crafty adventures with you in blogland - thanks for stopping by!!

image signature

December 23, 2011

Educational Decree -> for all Harry Potter Fans!


Have I got any Harry Potter fans in the house??
We have a really good friend who is 13, and she is way into Harry Potter. For her Bat Mitzvah, we got her "Dumbledore's Wand", and she was ecstatic! She said it was the best gift she got :) (Not bad for our first Bat Mitzvah gift ever!)

Well, for Hanukkah we wanted to give her something else Harry related - and for some reason I got it in my head to make one of these Educational Decree Signs (Actually, they have these for sale on various websites, which is probably why I thought it would be cool)...
These are the things that Dolores Umbridge puts up all over school in book 5 with ridiculous rules on them. Here's a picture of one from the movie:

And tell me, what avid Harry Potter fan wouldn't want one of these in their room?!  :)

I had a wooden frame that I had purchased on sale a while back (they are available at the craft store, and are great for painting and woodburning too)...

I only took a picture after I had started staining it, but you can see the shape at least.
On the bottom of the frame a piece of wood is nailed and glued so that it juts out a little bit to create a half inch ledge.
The top of the picture frame looks a bit like a house, as my daughter says. I used a piece of melamine board across the back to hold the "house shape" together. It looked just like this:


Each piece was nailed and glued onto that melamine board: the picture frame, the triangular shape, and the "roof" pieces - so that they were all held together....


 By the way, I cut all that wood with my mitre saw.  I am still in love :)


Here it is all stained.  I also glued a little lock onto the side.  In the movie the lock is there because it protects the "decree" behind glass.  I just found this little lock in the jewelry section of the craft store and thought it added to the charm of the sign. 


Then, I created a few different "Proclamations" in Word

Our friend was born in 1998, so all the decree's I made were "No. 98".


I also created a white board version!
I cut the black letters with my Silhouette and used some adhesive white board material (looks and feels like vinyl).  So now she has a bunch of choices - she can write her own decrees, or use some of the ones I made for her on printed paper. 

I was so excited to give it to her, and man was she surprised!!  I think she loves it, and I am so pleased with the way it turned out.  

image signature


December 20, 2011

Altoid Tin Felt Chapstick Holders


The other day, a friend of mine handed me 2 empty altoid tins and said, "I bet you can find some crafty use for these, hu?"
I was intrigued!  I hadn't really thought about altoid tin crafts before - but it sounded like a good challenge. 
I have been doing a little advent calendar for my kids this month - and one of the little gifts I had planned to give them was fun chapstick.  Turns out that these altoid tins are the perfect size to hold a couple of tubes of chapstick in!  So, this project was born...

I cut out felt the same size as the top of the tin, and little shapes and designs to decorate them with. 

Each has the initial of one of my daughters - to make them even more personal :)


With regular embroidery floss I did a running stitch to secure the felt decorations together (you could hot glue all the little felt pieces down if you didn't feel like sewing). 
I then used hot glue to glue the whole piece to the top of the tin.

For the sides I measured out strips in the correct size and hot glued them down as well.  Same for the bottom piece.
Below, you can see that the purple piece that wraps around the bottom edge matches the width of the bottom part of the tin when the lid is closed.

Here they are all finished...

And here they are with the chapstick inside...

My girls were so excited to get these little gifts!  (These would be fun last minute stocking stuffers).
The kids have been carrying them around - and love that they have their initials on them. 

I love how there is a crafty use for almost any old thing :)  Even altoid tins!!

image signature


December 13, 2011

Old Window Stocking Hanger


Pin It


Well, what do you think?!  I, personally, am smitten :)
We don't have a fireplace in our little apartment, so as soon as we started putting Christmas decorations up, I was charged emphatically by my children to find a place to hang the stockings.  As you can imagine, they were quite worried about it :)

Recently, I created this piece of art for our home from an old window that I found on the side of the road, and I have a few more old windows sitting in my basement now.  They are so charming, and so fun to work with, that I decided it would be GREAT to hang our stockings from one of the small ones. 


Here it is sans decoration.  I cleaned it off, and scraped off the bits of flaking paint, but it is in remarkable condition!


Plus, check out this little piece of hardware here that is part of the window... PERFECT for hanging a wreath!  I could have cried with happiness :)

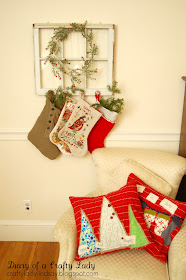
I drilled 4 holes along the bottom, and attached some pretty drawer knobs.  I had to buy longer screws to accommodate the width of the window frame, but now I can switch them out any time if I want different colors or styles. 


And here it is, stockings all hung, next to the pillow covers I recently made.  I am in LOVE!

Another tidbit of random information - my mom cross stitched my stocking when I was little, and gave it to me when I moved out of the house...I cross stitched my husband's stocking a couple years ago to match mine...and I made the green stocking from an old shirt, using this idea here from Martha Stewart :)  Works for this year!
image signature


December 7, 2011

Christmas Pillow Covers (made with decorated hand towels!)


Making Pillow Covers is fun, because they add a lot of character to a room, and they can be changed for every season or holiday.  On black Friday I picked up a couple of throw pillows at Target for really cheap, because I have been wanting to make some Christmas pillow covers for a long time :)


I have had these 3 Crate and Barrel hand towels for a couple of years, but haven't actually used them as hand towels.   They are nice and thick, and a nice bright red color though, and the perfect size for making pillow covers!!


I got the idea for this tree pillow from this etsy shop here.  A few triangles of burlap are covered by smaller triangles of fabric. 

Then, I zig-zag stitched a quarter of an inch inside the fabric triangles.  The words I wrote with sharpie onto scraps of muslin fabric.  The muslin rectangles are doubled up, and sewn 1/4 inch inside the edge.  And a few buttons added some more texture. 

To turn it into a pillow cover, I sewed a simple pocket pillow case.  About 1/3 of the towel was folded over, right sides together, and sewn along the top and bottom edge. (I planned the decorations on my cover knowing that the right third would be folded over and end up as part of the back of the pillow.)

The extra towel was cut in half, and again put right sides together along the other edge - so that the finished edge was toward the middle.  I then sewed along the top, bottom and outer edge of that side.  This left a pocket opening to turn the case right side out and stuff the pillow in.  


Since I had 3 towels I was able to make 2 pillow covers that fit perfectly, and on the 2nd pillow cover I  sewed ric-rac and mitten and stocking shapes.  The words were done the same as the other pillow case, with sharpie and scraps of muslin. 

I love how they turned out!  After finishing this project, I highly suggest using hand towels to make pillow covers - and there are so many cute holiday ones out there!  ...it makes it so much easier to have the finished edges to work with, and the thick patterned fabric!

We're sure getting excited for Christmas around here!  Hope you are too :)
image signature