Pages

February 2, 2012

DIY Ziplock Bag Travel Kit / First Aid Kit


This travel, first aid, odds and ends, whatever you want to call it kit thing is so cool, and was so easy to make!!
I originally saw the idea here at Tidy Mom
They used a pot holder for the outside - which is brilliant because they are already made, and they come in many adorable patterns.
I did not use a potholder however, for two reasons.
1) I will be packing mine around with me on vacation, and I didn't want to add any bulk that I didn't need.  I think potholders are a little bulky for this project.
2) I am impatient and the night I wanted to make this, it was late, and I had no extra potholders lying around the house :)

So, I made my own "potholder" - and made it a little bigger - to fit more in - and a little thinner. 


This size will work for either sandwich or quart sized ziplock bags - however I used quart size bags because they are so much thicker and sturdier. 

2 pieces cotten fabric - 14" x 8"
1 piece of flannel - 14" x 8" (this is optional.  I wanted to give my case a little bit of padding and form.)
1 piece cotton fabric - 14" x 6" (for the outside pocket - optional)
1 piece of interfacing - 14" x 6" (if you are using a pocket)
Extra wide, double fold Bias Tape (1 package will do)


First, iron the interfacing on to the back of the pocket.  Then, sew a strip of bias tape across the top edge of the pocket.  To do this, sandwich the pocket fabric between the bias tape, and pin it.  Sew as close to the open edge of the bias tape as you can, all the way across. 
Next, lay out your fabric in the final order as shown below:
1 Large cotton piece, wrong side up
Piece of flannel
1 Large cotton piece, right side up
Pocket (lined up on bottom edge), right side up

Pin the bias tape around all 4 edges and sew. Again, sandwich all the layers of fabric between the bias tape, and pin it. You will have to make some minor folds at the corners to make the bias tape continue around the edge. Sew as close to the inside edge of the bias tape as you can, all the way around.  

Here it is, all sewn.  I folded over the edge of the end of the bias tape and sewed it down to make a loop - just like a real potholder :)  Might come in handy sometime - who knows...

Now, the pocket will be on the outside, so flip the fabric over.  I used 10 ziplock bags, 5 facing each direction.  I alternated 1 facing left, 1 facing right, and so on. 
I liked making my case this size (larger than a potholder), because although the left side and right side ziplock bags overlap a little bit in the middle, there is not a ton of extra bag hanging over.  (You want some overlap, so that when you sew down the middle you catch the ends of all the bags to secure them to the fabric.)
Be sure you tape the bags generously with scotch tape before you sew down the middle, so they don't slide around.  Determine the center of the fabric, and sew along the center line a few times with a zig zag stitch, as shown below:

If there is extra ziplock bag hanging over, you can trim it off after it is sewn down. 
And here it is all sewn together! 
I added a little piece of cord, looped and sewn down (see picture above) to go over a button on the opposite side to secure it closed (see picture below). 


As I said, I am taking mine on vacation soon, and I am so thrilled that all these little odds and ends are in one accessible, colorful, convenient place!!
In mine, I put things like: bandaids, hair ties, hair clips, chapstick, floss, safety pins, hand sanitizer, hand wipes, tissue, feminine products, nail file, eye drops, pain reliever, sunblock, neo to go.  And yes, it all fits!!

So go make one for your purse, your diaper bag, your car, your friend, your babysitter, your child's teacher - I'm telling you, everyone will love it!!
image signature


January 30, 2012

Party Ideas LINK UP!

After finally throwing my daughter's birthday party, and seeing how much work goes into it, I would love to see all your party ideas!  And wouldn't it be fun to get a bunch of ideas all in one place?

Come link up your party ideas in my first ever link party!
Birthday, New Years, Baby Shower, Wedding ... any party, feel free to link up :)

January 28, 2012

Pirate Party Part 5: Invitations,Thank You Notes


Down to the last few details of the pirate party - the invitations and the thank you notes.
I thought about sending a "message in a bottle" for the invitations (like you see here), but ultimately decided not to.  I still love the idea - but it was not what I decided to spend my time on.

Instead, I made little treasure map invitations.
They have a little rhyme that says:
Ahoy Matey!
Come and join our pirate crew,
As we sail the ocean blue,
Let's go find treasure and gold,
As we celebrate
[Child's Name]
Turning __ years old!

After printing these out 2 to a page onto offwhite cardstock, I cut the edges wavy and actually burned them all around, using a candle :)  It was fun, and I think the kids loved getting them in the mail that way.
We put stickers over the back flap that looked like this:
I am so happy that my daughter was so excited to write her own thank you notes!
During the party, I took pictures of each of the kids.
Then, we had them printed out and used them for the front of the thank you cards!
I folded a piece of cardstock, and using photo corners, attached the pictures to the front.  That way, the parents could keep the pictures without ultimately having to keep the note :)

My daughter wrote in every single one - which was so sweet.  She also insisted on including a pirate coloring page in each one, since we had printed those for the party but didn't end up using them.  I thought it was a sweet touch.

And that my friends, is it!  5 posts to commemorate my first birthday party ever planned - and I am still so happy :)

Have you thrown a party?!  Come enter our Party Ideas Link up!


image signature

January 22, 2012

Pirate Party Part 4: Games


So, besides Dressing like a Pirate and Eating Lunch and Cupcakes, the big game at our Pirate Party was a Treasure Hunt.
Very Piratey, don't you think??
The treasure hunt helped them fill their party favor bags to take home too - which I think is way more fun than just handing them a bag filled with treats as they leave. 

I wanted each child to have their own treasure map, and actually this was one of the things my daughter specifically wanted months and months ago when she told me she wanted a pirate party.  She said that she really wanted a treasure map :)

In Microsoft Word, I took some clip art pirate pictures and arranged them around the page.  I added a dotted line, an "x marks the spot" and and the words "Captain Jocelyn's Treasure Hunt."
I printed the maps onto offwhite cardstock - enough for each child to have one.
You can see in the picture above, on the left is the printed page before I distressed it.  I cut uneven, wavy edges.  On the right, you can see how we inked the edges and wrinkled the whole thing to make it look a little bit more like an old map. 

Here they are, all rolled up and tied with a ribbon...


Around the building, I hid little treasure boxes, and next to them, a large image that matched an image on the treasure map
Below, you can see, I printed the treasure chest onto paper, and taped it on the wall, and the last item on the treasure map, is the same picture. 

So, the kids had to find the items on the map in order, and collected their treasure on the way.  They used the fabric goodie bags I had made them to collect their prizes...

Some of the treasure included, bouncy balls, candy, harmonicas, and other things I collected from the party supply store.
I also made them each one personalized prize - these "Gold Doubloon Necklaces"

These were so easy, and fun to personalize!
Each was made from a small lump of clay.  I used fimo/sculpey clay that gets baked to harden.


Some were made to look like treasure maps (above).
Some were made to look like gold coins (below).

I used the little letter stamps ($1 from the craft store), just like in this project here
After they were baked, I filled the indentations with a little bit of watered down paint to make the letters stand out.
The two holes were made with a skewer and allowed me to string a ribbon, and have the "medallion" lay flat when they wore it as a necklace. 

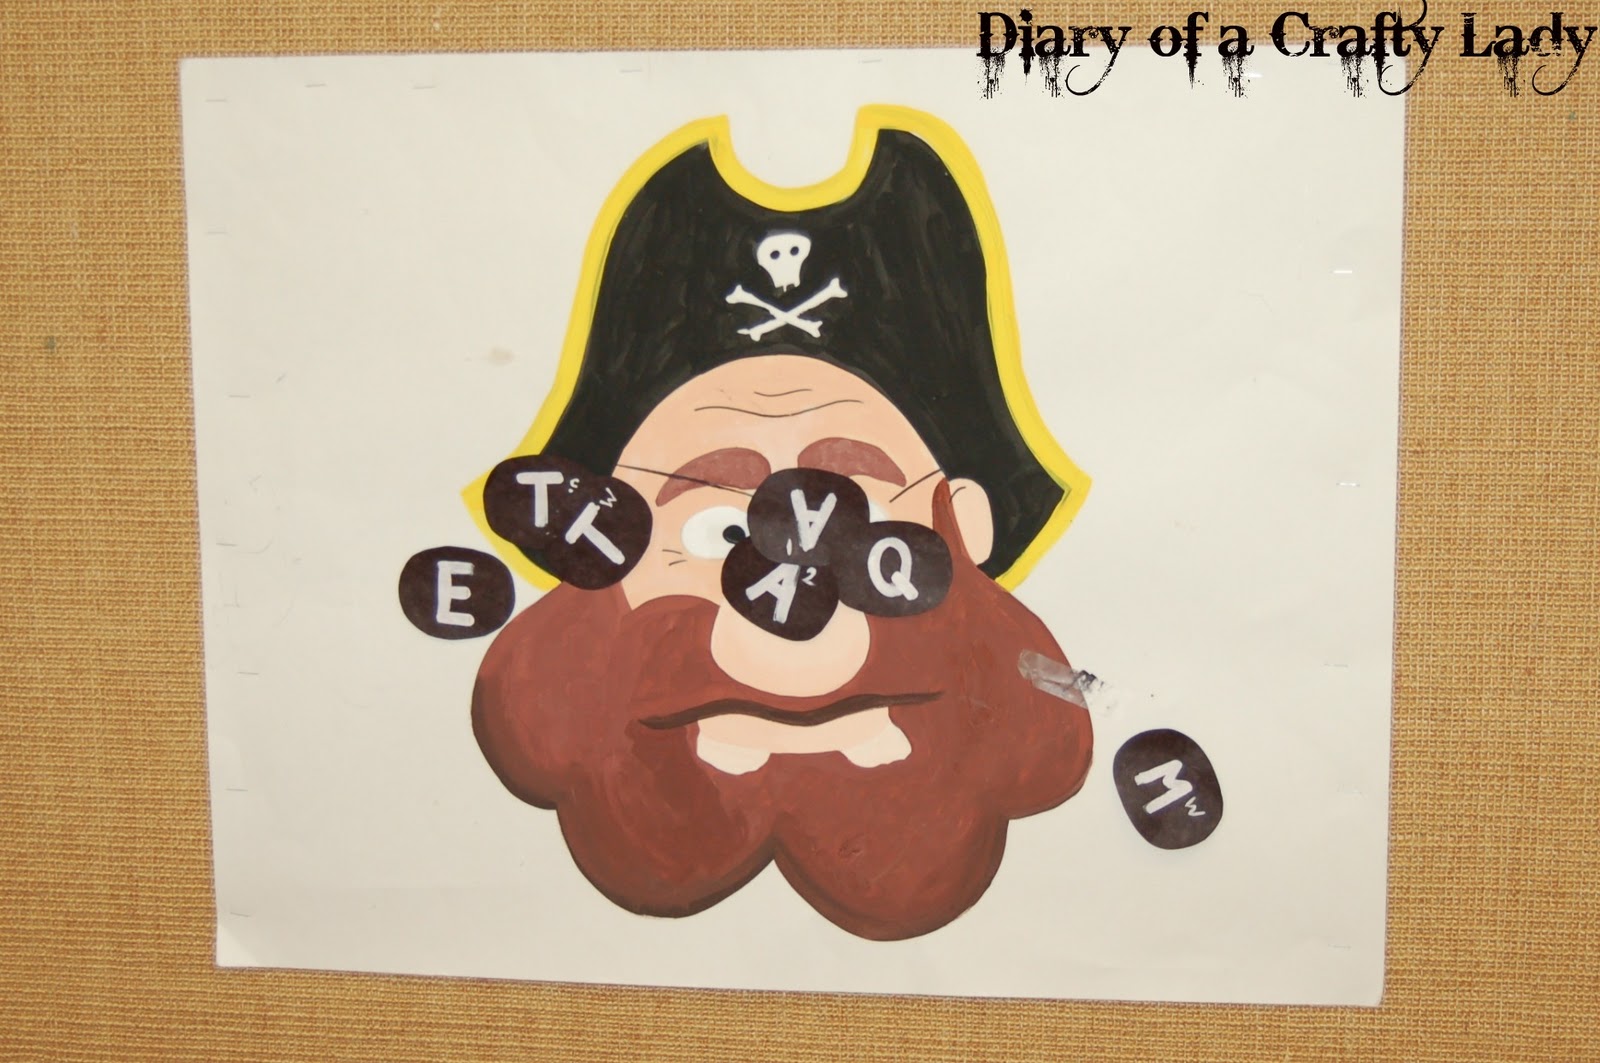
We also played "Pin the Eye Patch on the Pirate."

I sketched out a pirate face and painted it....


I made each child an eye patch out of construction paper, with their intial painted on it....

They all had a good laugh :)

We also read a few Pirate Stories that I had picked up from the library!
Now, this was kindof a last minute addition/decision - but I am SO GLAD I picked these up!!!
We read all 3, the kids LOVED it - they were all enthralled!!  In fact, the Port Side Pirates book came with a CD to sing the words - and it was so fun!
Granted, my voice was shot by the time I read 3 books in a pirate voice - but it was well worth it!!

We ended making fruit loop "jewel" necklaces - which was also really fun.  I gave everyone a piece of twirling ribbon with a fruit loop knotted on the end, and they threaded fruit loops on to their heart's content :)


I had the kids for 2 hours, and between all these games, dressing up, and eating, the time was filled perfectly!
If you missed it, be sure to check out:

Have you thrown a party??  Come enter our Party Ideas Linkup!

image signature

January 18, 2012

Pirate Party Part 3: Decorations


Arrrgg, Decorations .... Honestly, I think they were more for me than for the kids.  lol.  I mean, what kid cares what the signs say, or how the table was set?  And as many of you know, decorations can take FOREVER if you let them!

But still, decorations can make a party great, and add to the ambiance - and some decorations can be quick and inexpensive...and even if they aren't quick, they are still fun!

First of all, I went to town with maps as part of the pirate decor.  I LOVE how the maps looked around the room. 


I picked up giant old atlas from a pile of books that someone was getting rid of - with the intention that I would use the pages for crafts.  It worked perfectly!  The pages were thick, and the colors were bright! 
Even if you don't have an atlas though - any old maps will do!!

Those signs at the top of the page, I ran through my printer.  EASY and so festive!!

The boxes I wrapped in maps to use for the treasure hunt (more on that later)...

And below, I made little scull and crossbones 3D map cutouts to set all over the tables.  They looked SO COOL!!!

Here's how I made the 3D scull and crossbones:

I used my Silhouette to cut a bunch of scull and crossbones shapes - but you can use ANY shape you want - as long as it is symmetrical.

Below you can see the steps to make them:
1st) Fold 2 of the shapes in half
2nd) Set them one on top of the other and sew a line down the middle (where the crease is).
3rd) Fold open the shape along the sewn line.

4th step - If you want to make a 3D garland) Sew through as many shapes as you want, down the middle, without cutting your thread.  Fold open each when you are done. 


Seriously, you can do this with any shape!  Hearts, stars, superhero logos, animal faces, whatever fits your theme!!

Here is one of the garlands hanging...


In addition to maps, I made these Jolly Roger Flags and stuck them in mason jars I had filled with dried beans. 

I also took glass bottles and stuck Pirate Grog Labels on them - you can see some in the picture above. 


Here's how I made the Jolly Roger Flags:

1) Cut pieces of muslin fabric about 4" x 12" - or whatever size you want! (as long as it is a rectangle)
2) Using freezer paper, cut out jolly roger shapes.  In the picture below, you can see the shapes I cut with my Silhouette (with the shiny side of the freezer paper down). 
3) Iron the freezer paper shapes to the fabric.  See the picture below for placement.  Since the piece of fabric will be folded in half to form a flag, and I wanted a Jolly Roger symbol on both sides, I ironed 2 Jolly Roger shapes per piece - one on the left, one on the right. 

4) Spray paint the fabric black.  You only need to spray the side with the freezer paper on it.  The spray paint is great too because it makes the fabric more stiff. 
5) Peel off the freezer paper.
6) Hot glue a chopstick in the middle of the fabric.  Fold over the fabric to line up and form a flag, and hot glue the two sides together - particularly around the edges.  (Again, the chopsticks were free from the local Chinese Restaurant!)

I used big pieces of fabric from my stash to line the tables...Here is a picture of a table part way through its decoration...

I also pinned fabric up on the walls behind "dress like a pirate" table - and it looked a lot like sails...

Here is my sweet little pirate, blowing up black balloon "Cannon Balls."  We had about 75 of these around the room, and the kids loved kicking them around, and hitting them with their swords.  At the end, we let the kids "fire" the cannon balls, and pop them all.  They had so much fun!

Cupcakes are the way to go at a party - I have decided :)

I got the recipe from my sister - and I can absolutely testify to their amazing-ness....wonderful-ness....drool-worthy-ness....yah, they are THAT GOOD
And the wonderful Cupcake Printables can be found here at Cottage Industrialist

I used a ton of things that I could find around the house.  Mason Jars, beaded necklaces, anything gold colored, ropes, even some Halloween decor worked :)
And everybody seemed to love it!

Thanks for stopping by!
There will be more on games and activities to come.

And if you missed it, be sure to check out:

Have you thrown a party??  Come enter our Party Ideas Linkup!


image signature