Pages

December 28, 2010

Casserole Dish Carrier


After I had decided that I wanted to make etched glass serving dishes for my sister for Christmas, I found this great tutorial for a casserole dish carrier!  A fun combination gift, to give a carrier, and the personalized pan that fits inside. 
You must follow the directions very carefully, but the tutorial is very nicely written.  The finished product is so great! 
You can see in this picture below what it looks like with a pan inside:
This is the whole thing open.  I used different colored fabric for the inside and outside of my carrier.
For my sister, who takes food to friend's and relative's houses often, this was a perfect gift.  And I have to say, I felt very accomplished after finishing it!
image signature

December 27, 2010

Etched Glass Baking Dishes

My mom and I had a great time etching a bunch of glass dishes for our family and friends this year.
Glass etching is done with a cream that you buy in a bottle at the craft store (rather spendy, so use a coupon if you can!).  It permanently etches the glass in a matter of minutes!
I gave my sister a set of dishes along with a casserole dish carrier that I had sewn. 
My cousin got a pie plate along with the movie "The Waitress" - hence the quote "bad baby pie" on the pie plate....funny movie if you havn't seen it. 
It was a fun project for us to do together, and it is very fun to give personalized gifts!
We had vinyl cut with the last names of people we wanted to give gifts to - and sayings to get etched on as well. 
"Eat Me" - went to my silly sister in law.
"Bad Baby Pie" - to my movie loving cousin
"Made With Love" - went to my always-baking sister.
You get the idea. 
Some we just did first or last names, for a more elegant look. 
My mom also gave a set with last names as a wedding gift.
For some other great blogs that have given tutorials and have great pictures, go here to Nursery Rhymes and Sweet Times and here to Make it and Love it.
These are some in progress pictures:


Vinyl pressed right onto the outside of the glass dish became like a stencil for the glass etching cream

Some tips after doing a bunch of these:
1) Make sure you clean the glass with window washing spray after you put the vinyl on.  Fingerprints hinder the glass etch cream.
2) I would suggest putting the cream on even thicker than in this picture above!  I had to re-do some after rinsing off the cream, because I could tell that it wasn't even, and some spots had not been etched nearly enough. 
3) I dont think you can leave the cream on too long, so we left our cream on for half an hour or so. 
4) If you are worried about getting the vinyl centered (like me), use a dry erase marker to make marks, measured from the edges of the dish you are working with.  They will act as guides, and wash right off.
5) If you do a pie plate, have the vinyl cut in mirror image, so that you can etch onto the BOTTOM of the dish (keeping the actual pie crust off of it), but you can still read it when looking through the TOP of the dish. 


My mom made a few glass water pitchers, which turned out beautifully.  They were incredibly difficult for her to put on though, because of the curved glass.  As you can see, she cut slits to try to make the letters lay flat.  On some, she just put a single large letter (for the first letter of the last name), which was easier to apply, and also looked very cool!


As I said, this was a fun project, and everything looked GREAT when we were finished! 
I definitely recommend that you go make some!!

image signature


I'm Linking Up To:

December 26, 2010

Ride a Horsey - Horse on a Stick


My daughter LOVES horses. This summer was her first experience, when she rode a pony at our town day. Then, the next time she saw the carousel downtown, she freaked out, and exclaimed our favorite phrase to date:
"Wa' Wide-a Ho-see!"
(Wanna Ride the Horsey!)
We make her say it all the time:)

When I was a kid, I had one of these Ride-a-Horseys, and it seemed like a perfect gift for my little daughter!
I followed the tutorial I found for a sock horse here at The Napping House.


 I found socks at Target: Women's, Cotton, Pretty Thin, Earthy/Neutral Colors, Says they fit size 4-10, Maybe mid-calf length. 
The rest were scraps I had at home. 
The ears are felt. 
The mane is just flannel for me.  The tutorial says use "fabric" for the mane - and I am not sure what kind she meant.  Her fabric is double sided - meaning it looks the same from both sides.  Mine is not.  It definitely has a back side, however I didn't mind this.  I used 1 strip of fabric, twisted it and glued it down - not 2 strips twisted together.  I felt that the flannel was too thick for that. 
At first I wanted to sew it all together - because I have this thing about sewing being more permanent, and not wanting to wait for glue to dry:)  But hot glue worked great!  It does take a lot of hot glue though, and getting the ears to stay up was a challenge!  Not so much that I wouldn't suggest doing it, but just keep in mind it takes a lot of glue, and an understanding that it probably will not look exactly as you envisioned it from the beginning:)
 I used a 3/4" dowel, cut to the length that will fit into my suitcase to get it home:)
 My daughter seems to love it....though most of the time it gets carried around like a dolly:


image signature


I'm linking up to:

December 25, 2010

Personalizing a Diaper Holder


Woohoo!  Now that all the presents are opened, I can start posting about some of the gifts I made!  I made a diaper holder for my sister, and put her last name on it.
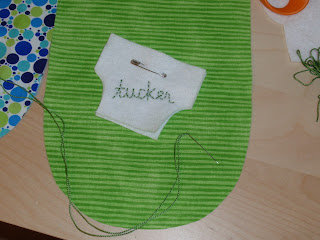
This is supposed to be the shape of a diaper:)  I sewed it on before sewing the actual diaper holder together...
stuck a safety pin through it....
hand stitched their name onto the "diaper"...
and sewed it all together like normal.  Here is my original tutorial!

She loved it:)
image signature

December 19, 2010

Key to my Heart - Anniversary (or Valentines Day!) Gift

My anniversary is in just a couple of days - and with the whirlwind of Christmas, and traveling to see family, I was a little behind on my anniversary gift (aka, had NO IDEA what I was going to do) :)
I had seen a similar idea to this one once upon a time, and it has been percolating in my mind for a while now.
The great thing that made it possible though, was this spectacular stash of antique keys!
My mom and I have a favorite antique shop in Concord, MA, which generally has a bowl FULL of unique and wonderful antique keys in all sizes and shapes. We have other fun plans for them, but the great thing about this Key to my Heart print, is that the keys are completely re-usable after you are done!
"But, what happens," you say, "if I don't have a spectacular stash of antique keys?"
Well...you could use regular house keys - or even if you only have 2 or 3 antique keys, you can use the same ones over and over again, and just point them in all different directions. Frankly, you could probably find fake antique keys in the jewelry department at the craft store. No matter what, I am sure it will turn out great:)

You will not believe what kind of "fabric" I used...(well, maybe you will).  This is a little square cut out from a canvas drop cloth!  Just a few bucks at the hardware store, and it works like a charm!  It is fairly thin, looks kindof like burlap to me, and has a thin plastic backing - great to keep the paint from soaking through. 
I cut mine about 9" x 11" so that I could trim it down to fit into an 8" x 10" frame if I wanted.  I made a heart shape in Word on the computer, nearly big enough to fill the page, and traced it very lightly with pencil in the middle of my fabric. 
 To imprint the keys onto the fabric, first lay down some squishy, soft fabric, like fleece, and then lay your canvas square on top of it.  That way, when you press the key down, the fabric will have some give, and conform around the bumps and shape of the key. 
With a paintbrush, spread on a generous layer of acrylic paint (I used black).
 Then, set it within the pencil outline of the heart.  Make sure that there is no excess paint on your fingers while you press.  I had a stack of baby wipes right next to me, and wiped my fingers in between setting the key down and pressing it in. 
 Carefully lift the key up, and immediately rinse it off with water.  The paint should come right off, making the key as good as new (or as good as old...hmm..).
 I wanted to put my husband's initial, and my initial, within the heart, so I used some rubber letter stamps for that.  I also added the year we were married, after adding a few more key imprints. 

 Sometimes I set down a few keys together before painting them, to make sure they were in a pattern I liked, but mostly I just winged it.
After I was finished, and the paint was dry, I erased the pencil tracing I had made of the heart.  The paint drys very quickly, and is permanent. 
 It looks great in a black frame, and I can't wait to give it to Sean!  Happy Anniversary to all, and I hope that maybe this will save some of you, trying to come up with a sweet, (last minute), home-made anniversary gift:)


image signature


I am linking to:

Visit thecsiproject.com