


Take it away Ashley!!
___.__.__.___
Hello Lindsay's readers! I recently worked on a very cool project that Lindsay asked me to guest post about, and I'm so excited to be doing this! I have to begin with a few disclaimers though....
*My pictures are nowhere NEAR as nice as Lindsay's (or any other blogger's for that matter)*
*No working, salvageable piano was harmed in the making of this post (this is especially important to me since I am a pianist and would never purposely dismember a working instrument)*
*I can't spell*
So, now that that's out of the way, we can begin!
I began this project on accident... I was actively looking for a used piano to call my own, and we have this fantastic local website with used listings. I found a beautiful old piano for free, and was fully planning on restoring it to working order...
I somehow got the beast home (seriously, it weighed probably upwards of 800 lbs. Funny side note, it took 2 adult men, 7 teenage boys, and 2 women to lift this monster into the back of my dad's truck... no kidding) and upon closer inspection realized the soundboard (what the strings are attached to and where the sound resonates) was cracked in several places, and while the basic mechanics where all in tact, it wasn't worth the time, effort and money it would take to restore it.
Sooo.... I decided to use the keyboard and platform to make a shelf for my house!


I love the antiqued look this piano has, so I decided not to stain it or paint it, but to just leave the natural wearing.
I took it apart piece by piece, and discovered much about the piano along the way... All I left behind the "shell", if you will.

This is an in-the-process picture of taking it apart. I set the keys on top of the piano with some of the misc. pieces, so it's a little jumbled looking, but that is the inside of an upright grand everyone!
(Another funny story... The screws that were holding the piano together had been in there for over 100 years, and were so rusted and fitted into place that I actually bent a screwdriver trying to turn them out.)

Once I had the keyboard off, I took off all of the keys (88 in case you were wondering) and began cleaning. This poor guy had been stored in a barn for upwards of 15 years, and had been sorely abused by its previous owners. It was COVERED in spider webs and dirt, and underneath all of that was a lot of crayon, scratches and carvings.
*I shake my fist in the air at the injustice*
Ultimately, I was able to get it looking reasonable again.
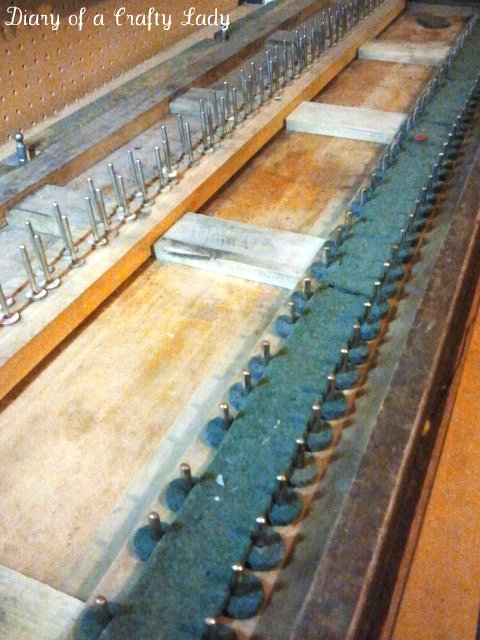
What you see above is the keyboard base after the keys are off... each of the 88 keys uses two of those pins you see. The green felt circles there are originally to keep the keys protected against landing on bare wood and chipping or denting as you played.
I used those and a strip of green felt from the back to prop up the keys. When they aren't attached to the hammers anymore (the felt things that smack the strings and make sound), they fall forward and can't be seen from the front, so I re-purposed some material there.
I used my dad's circular saw to cut down the base board right behind that second row of pins, taking off about 7 inches or so. You can see in the picture some lone pieces of silver hardware in the very back... Those are gone too :)

I also have to give a shout out to my good friend Jill... She let me borrow her husband's miter saw. *drool*. This one even has a draw on it!
One day... One day I tell you... I will OWN all of these tools!

I used the miter saw to begin the hair-cutting process of the keys. Each of the keys (after being scrubbed and sanded) was trimmed down to a size that would be manageable on my wall. You can see below how I cut the keys... those five on the right are un-cut and pretty darn long.

So with all the pieces cleaned and cut, I put the keyboard back together.
Below is a view from the back side of the piece, since I'm sure you all wanted to know how the back of a piano's keyboard looked... But be impressed readers! This is something you may never see again!
The keyboard cover is 'up', and the final top piece isn't on yet, but I wanted to show off my nice even cuts using equipment way above my pay grade. And I wanted you all to admire my beautiful plastic counters.

Here is the logo on the key cover... It was luckily still very much intact, and I was so pleased that it could be appreciated.

I was able to use all the original hardware to reassemble it which made me happy, and below is the final product on my wall!
 Don't ask how it got up there... I just about killed myself doing it. But it is mounted to the wall on 3 large wrought iron brackets which are screwed into studs. And let me tell you, these studs are super studly... I ended up breaking off my drill bit into the last hole. I couldn't get the leverage I needed, so I had to stand on a chair to put my weight into the drill, and torqued the bit and broke it off.
Ugh. The story of my life.
Anyway, I'm absolutely in love with it. It took ALOT of time, and a lot of dirty work, but I love the way it looks, and the style it brings into my house.
So there you go. Thanks again to Lindsay for letting me post! I really enjoyed doing this project... I don't usually do things quite so involved, but I couldn't let this piano be scrapped, and I love the end result!


f.jpg)

love it! awww so crafty!
ReplyDeleteLove. Love. My husband is a musician so reading the process was interesting. You are one amazing woman -- not to mention full of creativity. So happy you shared this.
ReplyDeletewow!!! I LOVE this!!! What a beautiful & clever idea! I'm jealous you have it! :)
ReplyDelete❤ Mor Zrihen from...
A Teacher's Treasure
Teaching Treasures Shop
That looks A-MAZING!!! Seriously wow. My mother-in-law right now is working on converting an old piano into a computer table. So hers looks a lot like your during photos (keys and pins removed but board still in place). I'm just so in awe of how awesome that looks and the amount of work that took. Whew!
ReplyDeletewow! how interesting and unique. what a special shelf.
ReplyDeleteSOOO Cool!! How fun! And very unique!
ReplyDeleteOh WOW!!! I'm in love! This is EXACTLY what I want/NEED in my music room. I've always wanted to hang a soundboard w/strings on the wall, kinda thought it would look awesome. I'm so jealous yet inspired to go find me a NON-working piano. We drug one (very old and VERY heavy) home once that my kids and I spotted on the side of the highway with a sign that read FREE on it. We called my husband to bring his truck when he got off work in two hours. Well, we sat with the free piano on the side of the highway and waited about 3 hours for him. My husband, my teenaged son (at the time) and pre-teen daughter (age at the time) and myself heaved and hauled until we managed to get it in the back of the truck. My son rode in the back with it, sitting on the wheel hump,playing the piano while going down the highway while I followed behind laughing at my son the entire way home. My daughter fell in love with it and it is HER piano. She won't let us tune it, loves that weird distorted old sound it has. It sits across the room from my Steinway and Son concert grand. Polar opposites.
ReplyDeleteAmazing. I am in awe, how did you even think of doing that? You're a genius!
ReplyDeleteThat is AWESOME! I love this - you should have your own blog too! Thanks for sharing.
ReplyDeleteAmazing! Not that I would expect anything less! :)
ReplyDelete-Shayla
LOVE this! I am glad it wasn't working. :-)
ReplyDeleteThis is just what I was looking for! I've got an old family piano that is beyond repair but so wonderful. I told the hubby we needed to save the wood to make things like back pack hangers and desk tops. However this is beyond my vision and wonderful! Thank you.
ReplyDeleteWhat an amazing accomplishment, big Kudos to you! A creation from love and passion; it shines.
ReplyDeleteI LOVE this!!!
ReplyDeleteThat has to be the most original shelf idea yet. I love it! Hats off to you for having the ambition and idea to take the piano apart and reassemble to your idea. I would be proud to have this in my home!
ReplyDeleteOh my goodness you are quite the clever girl! I LOVE this!! So unique :)
ReplyDeletevery nice!!
ReplyDeleteI have been looking and looking for ways to use an old piano. Great job!!!
ReplyDeleteI just saw your shelf - very nice! I had to reply because I also have a Hamilton piano - 1909 - that we totally restored! it is very similar to yours! It was a mess when we got it, but totally intact - in other words, it is the piano that you wanted to begin with - and 800 pounds is just about right!
ReplyDeleteThat is the greatest idea! I've been playing piano for 30 years and I love the idea of repurposing old pianos. We have an old upright in the basement that sounds horrific! Now, I have a summer project....lol!
ReplyDeleteThanks for the inspiration :)
ReplyDeleteGreat information for these home office design tips for entrepreneurs. Thanks a lot for sharing this post.
ReplyDeletewall corner wooden shelves
I feel a lot more people need to read this, very good info!
ReplyDeletehttps://victoriaparlett.blogspot.com/
Burton & Wilson, The Piano Craftsmen Was Founded By Robert A. Burton In 1951. The Wilson Family Joined The Firm In 1975. We Serve As Concert Technicians To The San Jose Center For The Performing Arts, The San Jose Civic Auditorium, The Montgomery Theater As Well As Universities, Schools And Churches In The Bay Area. We Serve 2,000 Clients Each Year In Their Homes And Studios. We Serve As Heirloom Piano Movers For The Greater Bay Area And Offer Climate Secured Storage For Fine Pianos. We Have Strong Feelings About Skills And Training At Burton & Wilson, The Piano Craftsmen.
ReplyDeleteGreat post on Wall shelf ideas! It’s impressive how shelves can add both storage and style to any space. I recently explored Vibecrafts, and their collection offers modern, high-quality designs that fit perfectly in any home. A great option for anyone looking to upgrade their interiors with smart and stylish storage solutions.
ReplyDelete