Pages

January 15, 2012

Pirate Party Part 2: Dress Like a Pirate


Shiver me Timbers!  The party was a great success!!  The kids had a great time, and there was plenty to do that everyone enjoyed :) 

First order of business - we all needed to look like pirates.
1) A hat was a given.  There are a bunch of free hat printables around - but these hats from the party store were cheaper than they would have cost to print them.  

2) I wanted the "color your own bandanna" because I wanted to kids to spend some time coloring while people were filtering in.  That worked out great!  Of course, not everyone arrives at the same time, so this was a great first craft, because it could go as long as necessary.

3) I found pirate tattoos, which I thought was pretty perfect for pirate apparel! (Luckily I remembered to bring a little washcloth that I got wet and left at the table, so the kids could put the tattoos on as soon as they came!)

You can see the sign on the table in the above picture.  The sign has pictures with each item the kids are supposed to take.

4) I found a great post on a blog called The Fickle Pickle - which is where I got a number of ideas that I used in my party - one of which being these mustaches


They are SO simple to make!  2 Pieces of felt for each mustache:

Put one on top of the other, and sew around, as close to the edge as possible.  Leave a tiny gap, just big enough to shove in some stuffing.
Then, squish a glob of hot glue on the end of a chopstick, stick it into the hole and pinch the felt around it until the glue dries. 
(I got these chopsticks for free from the local Chinese restaurant by the way.)


And my absolute FAVORITE part of the pirate apparel:
SWORDS!

Again, FREE AND EASY! (I told you I was doing this party on the cheap!)
The excellent tutorial can be found here at Alphamom.
These swords are made from 2 pieces of newspaper, rolled on the diagonal and taped.  (One end is folded over and taped to make a handle.)
And 1 small piece of cardboard cut into an oval, with a hole in the middle, that gets painted put on the sword to make a hand guard. 
And let me tell you - these were the HIT of the entire party!!


Here are all my sweet pirates dressed up and having fun!

Having everyone dressed up made the party very festive!

Soon, I'll show you some of the decor, the games, and more!

And in case you missed it, be sure to check out

Have you thrown a party?? Come enter our Party Ideas Linkup!

image signature

Linking up to:
Visit thecsiproject.com

January 11, 2012

Pirate Party Part 1: Muslin Drawstring Party Favor Bags


My daughter turned 5 a couple days ago, and we are having a birthday party in just a couple more days!
Many months ago she chose to have a "Pirate Birthday Party" - and a couple weeks ago I started working on the planning.  Let me tell you - it is hard to have a child with a birthday so close to Christmas!!  One is barely over before you have to be prepared for the other!

Well, in usual Lindsay style, I am going completely overboard for this birthday party.  It is the first one I have ever done - so I am a little overzealous :)
As such, I have done so many things myself that I have decided to break this party up into a series of posts - and these Muslin Take Home Party Favor Bags are Part 1. 

Part of my goal when preparing this party was to make it as inexpensive as possible.  I am making as many things as I can so that I don't have to buy as much.  So - most of these posts will feature ideas using things many crafty people probably have around their houses - and even if you don't, the materials are very inexpensive!


Muslin is a cotton fabric that you can find in a specific section of the fabric store.  There are different qualities - but to give you an idea, you can get a yard of fabric for $2 - easily.  And the width is double the size of a regular bolt of cotton fabric.  So, to make 10 goodie bags, I probably used 50 cents worth of muslin. 


Each bag will need 2 squares of fabric - mine are 8" wide by 9" tall. 
I wanted a design on the front of each bag.  So, on 1 of the square of fabric, I ironed Freezer Paper, which I had cut with my Silhouette, to create a stencil.

About Freezer Paper: (Skip if you already know!)
[Freezer paper is found near the tin foil at the grocery store, it is white like parchment paper, but has a slick side that adheres to fabric when ironed.  If you are using a cutting machine, put your freezer paper on your sticky mat, shiny side down.  Make sure it is stuck to the mat VERY well, so that as it is cut it doesnt slide and get stuck on the blade.  Don't cut too much at a time - smaller sections of freezer paper on the cutting mat are easier for you and the machine to handle.
You can also cut freezer paper stencils by hand if you don't have a cutting machine.
To iron, do not use steam, and iron carefully so the little edges are smooth and flat.]

Once the freezer paper is ironed down, paint inside the stencil (I used fabric paint, but acrylic paint works too). 


 When the paint is dry, peel off the freezer paper (it is very easy to peel away - and no residue is left!)

On each square of fabric, do a zig-zag stitch across the top to keep it from fraying.  One thing to remember about zig-zag stitch: keep your presser foot half on and half off the fabric.  I have a handy red arrown in the middle of my presser foot - and I keep the edge of my fabric in line with this arrow.  This way, the zig-zag stitch will not bunch the edge of your fabric.  Only one side of the zig-zag stitch will catch the fabric's edge, but it tightens up perfectly as you continue to sew. 

OR - you could fold that top edge down toward the wrong side of the fabric, and top stitch to make a nice folded edge.  

This picture shows the zig-zag stitch across the top of each piece...

Cut two pieces of fabric for the sheath to hold the ribbon.  They should be 1" wide, and the length should be 1" or 2" shorter than the width of your square of fabric.  My square of fabric was 8" wide, so I made my sheath pieces about 7" long. 

Sew 1 sheath piece to each front side of the bag, 1/2" to 1" from the top edge and centered between the right and left sides.  The right sides of both pieces of fabric should be facing you.
Only sew the two long edges (as shown by the red dotted lines below).  You want to leave the ends open to thread a ribbon through.  Sew with 1/8" seam allowance, or zig zag stitch along the long edge to keep it from fraying. 
Sew this piece on both squares of fabric on the right sides (which make up the front and back of the bag). 

Place the front and back of the bag right sides together.  Sew around the 3 edges, left, right and bottom, with 1/4" seam allowance. 
Both sheath pieces are inside, facing each other.  You want to make sure that you do NOT sew over the openings on the ends of the sheath pieces as you are sewing the bag together.
Turn right side out when finished.

Cut two pieces of ribbon to use as the drawstring.  I used grosgrain ribbon 3/8" wide. You could use twine, or rope. 
The length is determined by [width of bag] x 2 + [a few inches to tie a knot]
For me, my bag width was 8" x 2 = 16" + 4" extra to tie a knot = 20" long (each)

Using a safety pin, thread 1 piece of ribbon through the front sheath, and then the back sheath - ending on the same side, as shown...

Tie a knot to connect the ends of the ribbon. 

Take the 2nd piece of ribbon.  Thread it through the front sheath and the back sheath - begin on the side that does not have the knotted end. 

Tie a knot to connect the ends of the 2nd piece of ribbon, as shown. 

Your drawstring bag is complete!!


I decided after making them (it was really quick!!  From start to finish, all 10 bags took me a couple hours), that it would be fun to personalize them with the names of each child attending the party. 
Luckily, I had received RSVPs from everyone so I knew who would be there. 
I printed the names onto cardstock, and cut each name out. 
I slipped the name in the bag, positioned it where I wanted it, and traced it with a sharpie.  The muslin is thin enough that I could see the printed words on the cardstock through the fabric. 


I love how they turned out!!  Now, each guest will have a personalized bag to collect their treasure in and take home, and I only spent about $1 making all of these!
And remember - these bags are completely customizable
Add any picture, any words - or use any kind of fabric.  Leave them blank even!!  The fabric bag is adorable all by itself! 
And stay tuned for more Pirate Party posts - I warned you this would be a series :)


Have you thrown a party??  Come enter our Party Ideas Linkup!

image signature


January 7, 2012

Piano Key Wall Shelf - Guest Post!

You are all in for a treat!  My very talented and inspirational sister has agreed to do a guest post today on a project she worked very hard on.  She is much funnier than I am, so don't get too attached to her - though I am hoping that we have many more guest posts from her in the future!
Take it away Ashley!!

___.__.__.___
Hello Lindsay's readers! I recently worked on a very cool project that Lindsay asked me to guest post about, and I'm so excited to be doing this! I have to begin with a few disclaimers though....
*My pictures are nowhere NEAR as nice as Lindsay's (or any other blogger's for that matter)*
*No working, salvageable piano was harmed in the making of this post (this is especially important to me since I am a pianist and would never purposely dismember a working instrument)*
*I can't spell*

So, now that that's out of the way, we can begin!
I began this project on accident... I was actively looking for a used piano to call my own, and we have this fantastic local website with used listings. I found a beautiful old piano for free, and was fully planning on restoring it to working order...

I somehow got the beast home (seriously, it weighed probably upwards of 800 lbs. Funny side note, it took 2 adult men, 7 teenage boys, and 2 women to lift this monster into the back of my dad's truck... no kidding) and upon closer inspection realized the soundboard (what the strings are attached to and where the sound resonates) was cracked in several places, and while the basic mechanics where all in tact, it wasn't worth the time, effort and money it would take to restore it.
Sooo.... I decided to use the keyboard and platform to make a shelf for my house!


I love the antiqued look this piano has, so I decided not to stain it or paint it, but to just leave the natural wearing.
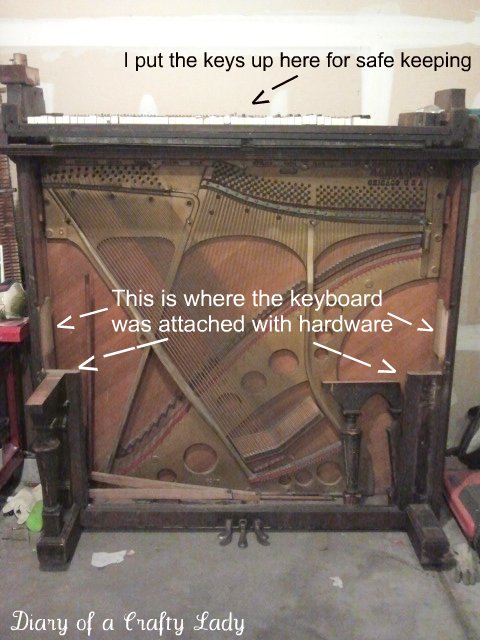
I took it apart piece by piece, and discovered much about the piano along the way... All I left behind the "shell", if you will.

This is an in-the-process picture of taking it apart. I set the keys on top of the piano with some of the misc. pieces, so it's a little jumbled looking, but that is the inside of an upright grand everyone!
(Another funny story... The screws that were holding the piano together had been in there for over 100 years, and were so rusted and fitted into place that I actually bent a screwdriver trying to turn them out.)


Once I had the keyboard off, I took off all of the keys (88 in case you were wondering) and began cleaning. This poor guy had been stored in a barn for upwards of 15 years, and had been sorely abused by its previous owners. It was COVERED in spider webs and dirt, and underneath all of that was a lot of crayon, scratches and carvings.
*I shake my fist in the air at the injustice*
Ultimately, I was able to get it looking reasonable again.


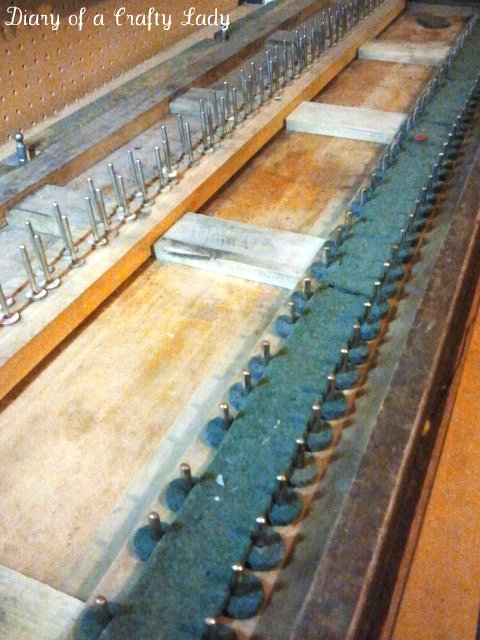
What you see above is the keyboard base after the keys are off... each of the 88 keys uses two of those pins you see. The green felt circles there are originally to keep the keys protected against landing on bare wood and chipping or denting as you played.  
I used those and a strip of green felt from the back to prop up the keys.  When they aren't attached to the hammers anymore (the felt things that smack the strings and make sound), they fall forward and can't be seen from the front, so I re-purposed some material there.

I used my dad's circular saw to cut down the base board right behind that second row of pins, taking off about 7 inches or so. You can see in the picture some lone pieces of silver hardware in the very back... Those are gone too :)

I also have to give a shout out to my good friend Jill... She let me borrow her husband's miter saw. *drool*. This one even has a draw on it!
One day... One day I tell you... I will OWN all of these tools!

I used the miter saw to begin the hair-cutting process of the keys. Each of the keys (after being scrubbed and sanded) was trimmed down to a size that would be manageable on my wall. You can see below how I cut the keys... those five on the right are un-cut and pretty darn long.

So with all the pieces cleaned and cut, I put the keyboard back together.
Below is a view from the back side of the piece, since I'm sure you all wanted to know how the back of a piano's keyboard looked... But be impressed readers! This is something you may never see again!
The keyboard cover is 'up', and the final top piece isn't on yet, but I wanted to show off my nice even cuts using equipment way above my pay grade. And I wanted you all to admire my beautiful plastic counters.

Here is the logo on the key cover... It was luckily still very much intact, and I was so pleased that it could be appreciated.


I was able to use all the original hardware to reassemble it which made me happy, and below is the final product on my wall!
Don't ask how it got up there... I just about killed myself doing it. But it is mounted to the wall on 3 large wrought iron brackets which are screwed into studs. And let me tell you, these studs are super studly... I ended up breaking off my drill bit into the last hole. I couldn't get the leverage I needed, so I had to stand on a chair to put my weight into the drill, and torqued the bit and broke it off.
Ugh. The story of my life.

Anyway, I'm absolutely in love with it. It took ALOT of time, and a lot of dirty work, but I love the way it looks, and the style it brings into my house.


So there you go. Thanks again to Lindsay for letting me post! I really enjoyed doing this project... I don't usually do things quite so involved, but I couldn't let this piano be scrapped, and I love the end result!


January 3, 2012

Old Window, Big Picture


Yes, I have finished yet another old window project.  I just LOVE them!
This window was another side-of-the-road find...and it is in EXCELLENT condition.  The paint isn't even peeling!  (At least, not like some of the others I have...)


I have seen a bunch of windows like this used as picture frames, but they always have a small picture in each section.  I wasn't too big on that idea - but when I saw this pin on Pinterest - I loved the idea of a large picture covering the whole thing.
And do you want to know something great?!  This project cost me a total of $2.11 (!!!)