Pages

August 21, 2012

Fairy Houses: A Fun Summer Project


With my daughter nearly off to her first year of school, we have been having fun doing things together before she is a big Kindergartner, and gone from me for most of the day :(  (Are you sensing my trauma??)
When we were at the craft store the other day, we spotted all these darling birdhouses on sale - on my mom had the brilliant idea to make them into fairy houses!


Each birdhouse cost $2 or $3, and the only other cost associated with the project was glue!  Very inexpensive, and my girls had so much fun!!

Below you can see the birdhouses pretty much as we bought them.
The girls painted them first with acrylic paint (because they absolutely love to paint, and it gave us a colorful base in case the wood showed through after we were done gluing.)

We went to the beach and collected a gigantic pile of shells and rocks.  We also collected sticks and leaves from around our house.  Pretty much anything earthy and organic made it into the pile. 

I picked up the super strong glue from the craft store that doesn't smell - so that the kids could use it without worry. 
I smeared a layer of glue on the first side, and let the girls stick shells and rocks to their hearts content.  I helped them push things close together, but they were really able to do most of this on their own.

We let each side completely dry before starting another side (sometimes for a whole day).  It stretched out the project, and allowed us to collect more items as the days went on. 

Here you can see that we have many more sides done.  Sticks for the roof, some twine, etc.


And here they are all done!
We finished some of the sections with raffia, beads, beans, fake flowers -- things that fit each space and covered all parts of the wood.


The girls are now having fun making "beds" and putting things inside. I think they look adorable in the garden!


image signature

August 11, 2012

Picture Frame Book Shelf


Is this a clever little project, or what?
I love to read.  Because I am a busy mom, I often read after the kids have gone to bed, and before I fall asleep - which means I keep my books by my bed. 
Usually I borrow books from the library, so I tend not to have too many at one time, but even so, I only have a tiny night stand by my bed that I have used to pile my books, lamp, phone, lotion, and a number of other things that find their way there :)

When I saw this pin on Pinterest, I think my jaw fell open a little bit.  I loved it!  So clever, so DIYable!


Lucky for me, I found this picture frame in the giveaway pile! (okay someone's garbage pile...along with some other home decor I didn't want...listen it is not as weird as it sounds!  People pick stuff up off the side of the road all the time here!) ;)

It is probably an 8x10 picture frame, wood, funky design...perfect for a bookshelf!

Using some scrap wood that I had, about 4" wide, I built a box frame the exact size needed to fit inside my picture frame.  I used wood glue and nails to put it all together, as seen below:


As you can see below, it fits perfectly inside my picture frame.

From here, I glued the box to the picture frame.  I would have used nails too, if I could have...but I couldn't get them to go in at the correct angle.  So, since I knew my books would not be resting on the frame itself, I used wood glue to attach the box and the frame, and weighed it down with some bricks until it was dry.  After all, wood glue bonds really strong, as long as it is held tightly together while it cures. 

Next, I painted it.  I could have stained the box for a natural look, but I decided to paint it.  I can always paint it a different color if I want - so I went simple black and white for now. 

I painted the whole thing white, and then taped off the inside to leave the box white and then painted the frame black:

Here it is all painted (above) and distressed a bit and sprayed with a clear coat (below).

I used 2 D Ring Hangers (click on the link to see what those are), attached to the back of the box, to hang it.  Then, I put mollies and screws into the wall to hang the D Ring Hangers on.  This method allows the box to hang flush against the wall, and it is very strong, so the books won't rip it off the wall.


I am so excited to have my books off the night stand, and in this handy frame!!  It is working great, and it looks pretty cool too. 


image signature

August 4, 2012

Pallet Style Shoe Rack {Tutorial}


When you live in a small house (and let's face it - what New England house isn't small?) you learn to utilize every available space :)
My husband loves his shoes - and because we have one tiny closet in our bedroom, he uses the closet in the kid's room.  So, his oft worn shoes are oft found lying around the bedroom floor - and my pregnant belly does not allow me to see them and so I end up tripping over them! :) 

Enter this handy, minimal space taking shoe rack!  We had this 16" of space beside the dresser and the heating coil, and it was enough!

I ravaged the scrap wood pile at the hardware store, and bought all the wood I needed for just a couple of dollars.  This would be a great project for any kind of scrap wood - so you can make one very inexpensively. 

I started by making something that looked a lot like a ladder.
The width of my space allowed for a 16" wide shoe rack, so each of my cross pieces is 16" wide.
My dresser is a little over 3' tall, so I made the rack approximately that height so that it would be hidden by the dresser. 

To calculate the exact height, I took the width of each cross piece (2.5" for me), plus the width of the gap (3" was a perfect gap to fit the shoes in), and added them together.  I did that until it added up to about the height I wanted.  (This was easier to do visually, on a piece of paper, so that I could see how many boards and gaps I would need to reach the approximate height I wanted). 

July 30, 2012

Fabric Silhouette and Cameo Dust Covers


I have been lucky enough to have a Silhouette cutting machine for a while now - I got it as a Christmas gift when it was on a really good sale - and I have a lot of fun with it!
I have not been very kind to it however, because I have let it sit on my desk all this time with no cover!
I finally made one the other day, and I wish I had done it sooner!  It was a very fast project, and I feel so much better now, knowing that dust isn't collecting in all the little mechanical parts.

I used the pattern found here at Crap I've Made - and it worked great.
I did make a slight modification though:
Instead of doing a double fold on the bottom, I folded it under only once, sewed around and left a small opening, and threaded a thin elastic cording through
I wanted the bottom to fit snugly around the machine, so that there was no risk of it coming off.  I did a zig zag stitch along the bottom edge of the fabric, to keep it from fraying, since I only folded it under once, and the raw edge is visible on the inside.  The elastic isn't very tight -- just enough to make it pull a bit around the bottom of the machine. 


My mom has a Cameo - and when she came to visit me recently, I made her a cover too :)
For the Cameo, I used this tutorial at My Craft Spotlight.  I made the same modification as I did with the regular Silhouette pattern, and added elastic to the bottom. 
I have to say though, this Cameo pattern did not match up as well for me as the other pattern did.  I had to adjust the width of the rectangular piece to make it match up with the end pieces.  So, if you use it, just keep in mind that you might have to make some adjustments, and almost bunch your fabric to have the edges line up. 


 These pictures give you a better idea of the elastic, and how tight it is...

So, show your machinery a little love, and make some dust covers :)

Need a pattern for your sewing machine?  Check out my tutorial here for a Sewing Machine Dust Cover
image signature


July 28, 2012

Kitchen Wind Chime


I've had a picture on one of my Pinterest boards for a while - a darling wind chime made with odds and ends - from a blog called Blogesteix

When my mom was in town last week, we did a bunch of projects together (she is an amazingly crafty person too!) and this was one of them.  We gathered all sorts of odds and ends to make a kitchen wind chime - some antique things, some discarded things...and I love the way it turned out!

We got this donut cutter for the top from a kitchen store. I later found an old orange juicer top that is the same size, with holes, that I will use to make another one. I would have loved a vintage cookie cutter for the top, but this was inexpensive easy to find.


I used my drill and a tiny drill bit to zip holes around the outside of the cutter.  5 holes in the outer ring and 3 holes in the inner ring - spaced somewhat evenly :)


Next comes the "odds and ends" part.  We found little glass squiggles on mega sale at the craft store.  I pulled out some buttons and beads that I had lying around, and then went rummaging through my kitchen drawers and junk drawers. 
I found a little spoon, an antique bottle opener, an unused pour spout - all small kitchen items that I knew would be perfect for my wind chime!
Using silver colored copper wire (also from the craft store) we made lots of whimsical twirls and wound strands of our odds and ends to hang from each hole in the donut cutter. 


Right now it is hanging near my kitchen sink, and I really love the color and charm. 


My mom also made one inspired by this picture here.  We think it looks like a jellyfish :)

Aren't wind chimes so happy!?
image signature

July 15, 2012

Summer Activities with the Kids


I have a board on Pinterest with crafts to do with my kids, and it has been fun over the last week to pick out a few easy things to do. 
In the picture above I let the girls toss a few toys in a tupperware, filled it with water, and stuck it in the freezer.  The next day, it was over 90 degrees outside, and we all went out and they got to hammer on their ice to their heart's content!  The toys eventually popped out of the ice, and we all felt a little bit cooler with bits of ice flying around :)
Inspiration for this activity was found here at Counting Coconuts.


Another good hot day activity -- anything to do with soapy, sudsy water :)  I had the girls washing toys with toothbrushes - they loved it!  We also washed the car, and washed the kitchen walls together (both done in swimsuits).  They girls had so much fun getting as wet and soapy as they wanted - and I ended up with a much cleaner house!!


This one took a tiny bit of prep, only because I had to collect TP and paper towel rolls for a few weeks.  We ended up with a cool marble run that provided quite a bit of entertainment!
The girls colored the tubes with crayons, and I cut them up and taped them to the front of the fridge.  We had a couple runs going so they could race their marbles - and left a bowl at the bottom to catch them as they dropped. 
Inspiration for this craft was found here at Family Fun

Hope you are all having a fun summer!  Hop on over to my Pinterest board for more ideas - and let me know what your favorite summer activities have been!


image signature


July 8, 2012

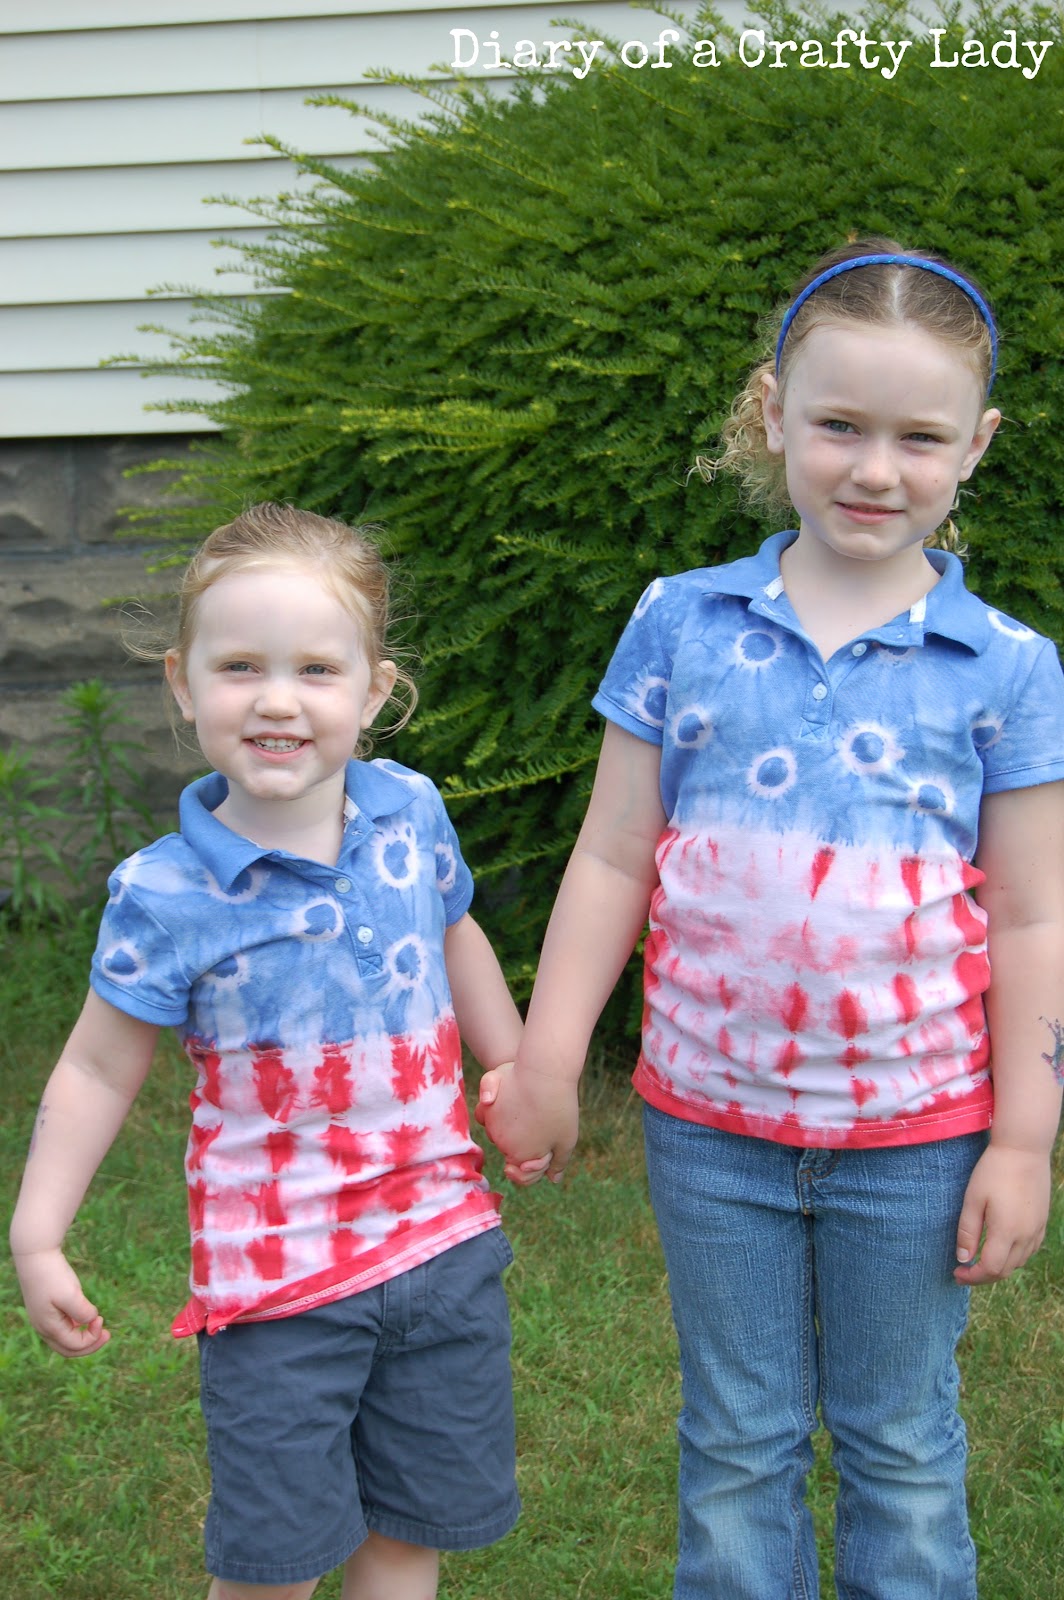
Patriotic Tie-Dyed T-Shirts


Happy 4th of July!!

Okay, I realize that I am a bit late :)  We have been out of town, with relatives visiting, and I finished these great t-shirts during a spare moment I had in between trips - so I am just now, barely, sitting down to my computer! (BTW, yes, I am 6 months pregnant in this picture...girl # 3 - here she comes!)

As soon as I saw these 4th of July Tie Dye T-shirts on The Creative Vault blog, I knew I wanted to make them!  Click over there for a great tutorial.  All you need are white t-shirts, blue and red rit dye, and rubber bands/marbles for the tie-dye part.

And let me tell you - they were a hit!  The girls looked so great gallivanting all across Boston in these shirts, and we got quite a few comments.  It was really fun for all of us to match :)


Want to see some of the fun things we did??
The Tall Ships were visiting Boston over the 4th of July - and they were such an awesome sight!  And I loved taking pictures of my patriotic kiddos. 


These two adorable officers were from Ecuador (above) and Indonesia (below).  Their ships were filled with amazing colors and references to their home countries...

These shirts were even good for hangin' around by the harbor...

They hid the stains well :)  Can't see the pizza sauce and greasy fried dough finger marks, can you?? ;)
If you ever have the chance to be along the Charles River in Boston for the 4th of July fireworks - I hope you do it!  We sit on the Cambridge side of the river, and listen to the Boston Pops through the loud speakers - it is spectacular!

I have a feeling the kids will like wearing these shirts through the summer -- they are unique and fun.  And really, there are plenty of reasons to be patriotic, even after the 4th!

image signature