Pages

June 23, 2011

Stars and Stripes Forever - Specimen Art


4th of July is just around the corner, and I can't believe it!  It is such a fun holiday here in New England.  Our family loves going down to sit on the banks for the Charles River in Boston and watch the world famous fireworks while the Boston Pop's Music plays!
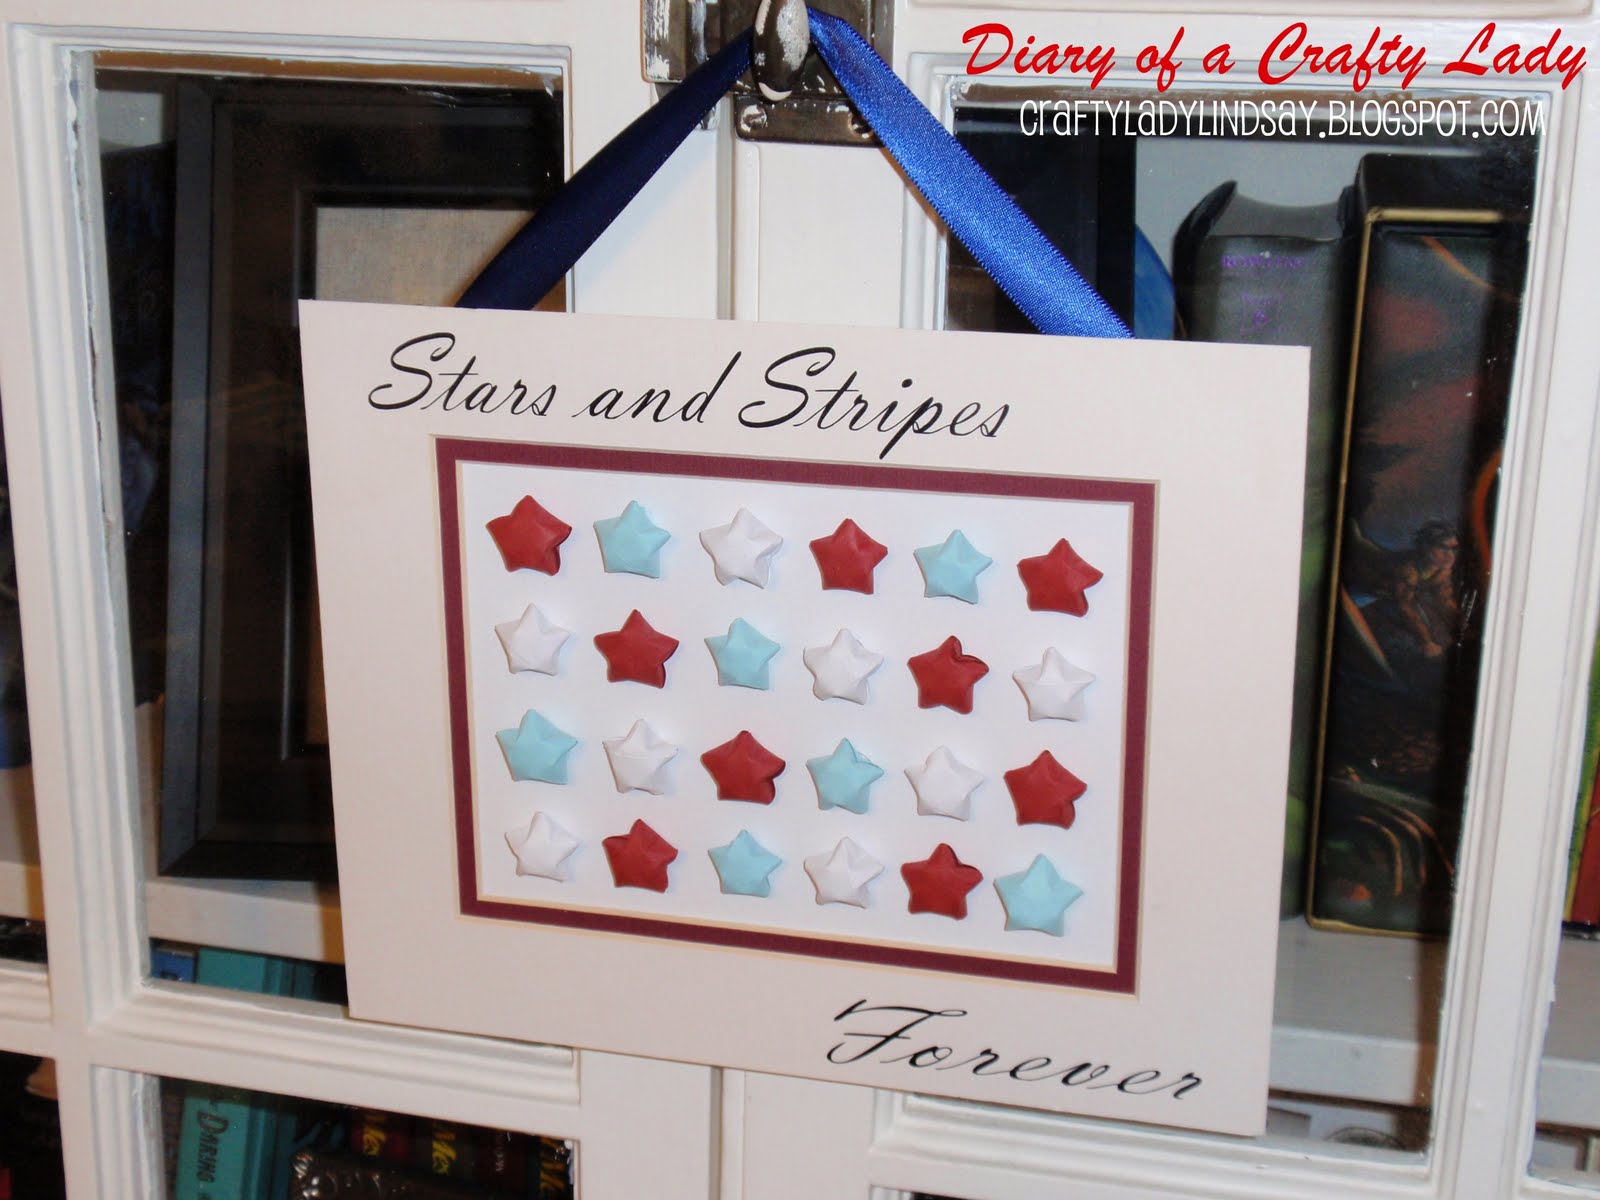
A few months ago, I saw this post at Nifty Thrifty Things about making easy little 3D paper stars.  This was also about the time that blogland seemed to be inundated with specimen art of every kind :)  So, my mind immediately went to the idea of making star specimen art for a bit of 4th of July decor. 

I started by making a stack of little red, white and blue stars, using the Nifty Thrifty Things tutorial - and they are very quick to make.

Then, I wracked my brain for a way to display them.  Luckily, I had taken apart a picture frame for another recent project, and had this mat leftover.  Score!

I took a piece of white cardstock, big enough to fit behind the mat, and hot glued rows of stars to fit inside the mat. 


I toyed with the idea of handwriting my words - but I'm a bit of a perfectionist :)  Why write it when a Silhouette can cut it out perfectly?  So, with my Silhouette, I cut the words "Stars and Stripes Forever" in vinyl and stuck those onto the mat.

Then, I taped the cardstock to the back of the mat - so the stars fit inside the mat...

Aw yeah!  I hot glued a piece of blue ribbon to hang it - and that is it!  I love it! 
Remember, that you can get just the mat (without a picture frame) at the craft store... I love using a mat without a frame for these inexpensive little projects. 


Happy Birthday America!
image signature


Visit thecsiproject.com

June 19, 2011

A Few Father's Day Gifts


Handmade gifts are the best for Father's Day - don't you think?  Now that my kids are getting older, it is so fun to really include them in the creation of the gifts.
For my husband, I had my girls help me make a Garden Journal, and a Painted Canvas - an "original" piece of art :)

For my dad, I sent him a little glass jar with vinyl letters on the outside (cut with the Silhouette of course), and some money inside.  He thinks he might use it for a candy jar - which would work too!
The saying is a play on words - to mean "Don't Touch My Stash" (Don't Touch Moustache).  I got a good chuckle out of that one ;) 

Three years ago, when my daughter was just 1 & 1/2 years old, I painted the background of this little canvas, and let her paint over it, however she wanted.  That was the Father's Day present that year, and my husband has always loved it.  He keeps telling me he wants more.  


So this year, I did as he wished, and had both my daughters go to town on a bigger canvas:


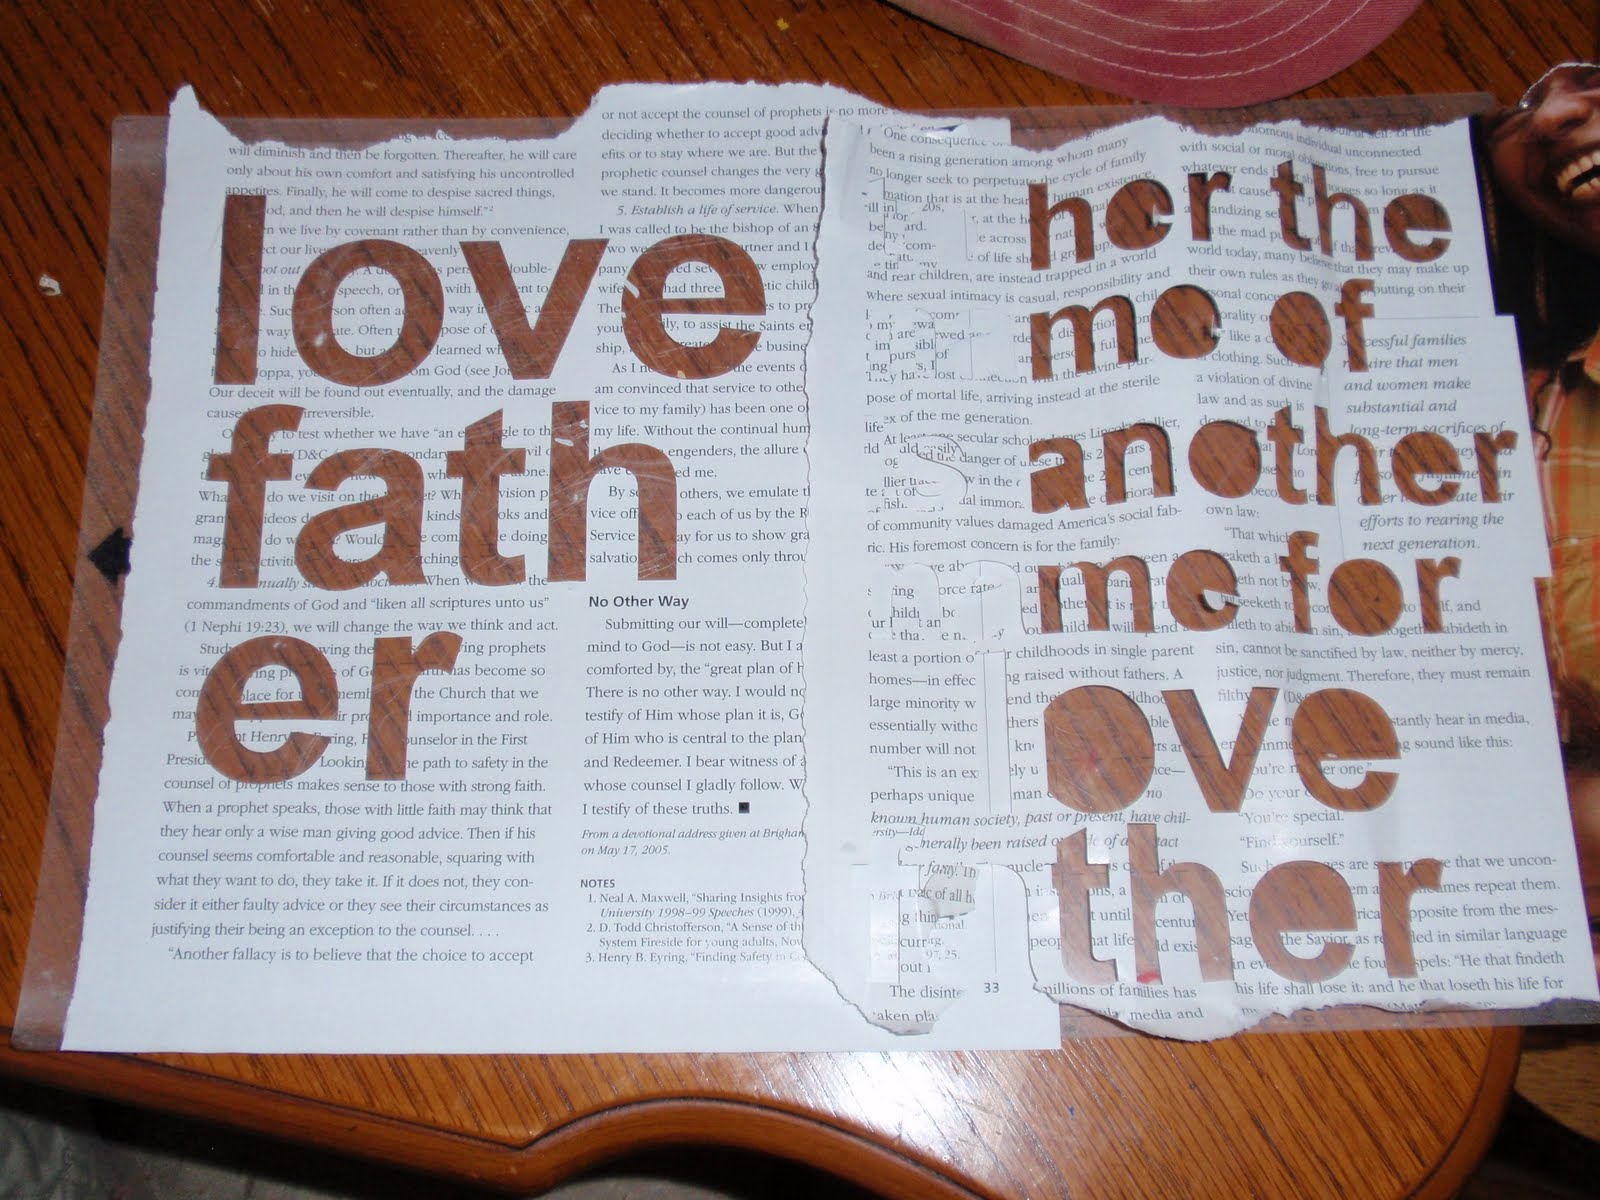
Once they were done painting, I found a saying that I thought fit him perfectly, and cut out the words with the Silhouette, using a magazine page:

They got mod podged onto the painting - and I really like the look of the words, not perfectly straight, and filled with the printing from the magazine.  It seems to fit the feel of the painting...

And now it can hang next to the yellow one; two father's day gifts that are all his little girls...

The Garden Journal was simple - a composition book with scrapbook paper mod podged on.


I let the girls pick out some dried grass and bits of bark dust to mod podge on the cover, along with some plant stickers.  They had a lot of fun.  Now my husband can keep track of how the plants grow - because we never can remember from year to year which brand and kind we liked best.  Gardening is another thing the girls love to do with their daddy. 

Last year, I dressed the girls up in their dad's clothes, and took pictures to put in a frame with their handprints...that was pretty cute too:)


Words can not describe how thankful I am for my husband as a father, and my own father.  It is fun to honor them this day, as we try to do each day of the year.  Hope you had a peaceful Father's Day as well.  (And the cherry on the cake?  My little sister is in the hospital right now having a baby - making my dad a grandfather again on this special day!)

image signature

June 11, 2011

Selvage Edge Fabric into Drawstring Tote Bag


Is this one awesome bag or WHAT!?  I can't stop looking at it, I am so happy with it!  I'm like a little kid - just carrying it on my shoulder, even though I have nothing to put in it :)

This bag was made using SELVAGES.  A Selvage is the white strip of fabric, at the edge of the roll, that has info about who made the fabric, etc.  It is the part you usually cut off and throw away - but no more!  If you save them, you can make anything you want with them, and it looks so unique!!

I made this particular bag using a pattern from Crystelle Boutique - but the brilliant thing is -
you can make any bag (or any thing) you want using selvages!

Granted, it does take quite a few selvages to make a bag.  Just because I knew you would all be curious, I counted how many yards I needed to make this bag. 
Are you ready for it....
In needed 36 YARDS of selvages!  And I was very frugal! 
WOAH.  I did not expect that I would need so many!!  I cut the selvage off of every piece of fabric that I own, AND had my mom AND my sister send me their's as well!  And I barely had enough.  I thought for sure that I would be able to make a couple of bags with the gigantic pile I had set aside.  But, this bag was big, and selvages are small :)

(Now I cut them off as soon as I get new fabric, so I have nice long pieces - and I cut them at least 1" thick.  It looks great if there is some part of the actual fabric showing as well - adds some good color)


Each selvage was about 1" wide - but when you overlap the raw edge with finished edge, in order to sew them down, each strip shows only 1/2" to 3/4".  Selvage Edge Boutique has a great tutorial on how to do this:

As you can see, it takes quite a few selvages to make squares of 12" x 16" fabric like you see below (and I overlapped and sewed them as close to the edge as I could possibly get) - but they look so cool when you are done!  I made them this size because that is what I needed for my pattern.  Whatever you want to make, start by cutting muslin to the correct pattern size, and sewing the selvages to that.  You can then follow your pattern, sewing just as you would with any piece of fabric. 


I used really bright, colorful fabric for the lining, because I thought it complemented each tiny bit of color in the otherwise mostly white selvages. 


So, here is my plea to all my family and friends -
IF YOU DON'T WANT THEM,
SEND ME YOUR SELVAGES! :)
I am totally addicted now, but it will be a LONG time before I have enough selvages to make something else at the rate I buy fabric :)
And if you would like - in exchange, I will make you a little selvage tissue holder!  How cute is that!? ;)
(feel free to email me at craftyladylindsay[at]gmail.com)


Let me know if you have made something using selvages!  Now that I have discovered this medium - I would love to see more!

image signature


May 24, 2011

Personalized Clay Rock Magnets


This project came about for a couple of reasons.  1) I love magnets.  2) My kids love rocks.  Put them together, and they turn out pretty cute!
I also had some darling inspiration: This nest with "eggs" inside by Two Shades of Pink - where each egg is stamped with their family's names.  And also, these little balls of love from the crafty CPA

So, I took 2 light, natural colors of sculpy/fimo clay (the kind you bake), and squished them together to make a mottled, marbled looking "rock". 
To make the rock shape I used a little piece of foil for the middle, to save on the amount of clay I used, and to make the rocks lighter in weight. 
As you can see below a little piece of clay can just be wrapped around a ball of foil and pinched together and shaped with fingers until it looks like a rock. 
Since the clay is warm and pliable from squishing it and holding it in your hands, you can use small alphabet stamps to impress words into the clay.
I found this little set for $1 at the craft store, and it worked great!:

I tried to line them up, and space the letters evenly, but imperfection adds to the charm:)  I pressed as far as I could, without impressing the straight lines or corners of the edges of the stamps. 

Below is a picture of the indentations from the letter stamps, before it has been baked or painted.

Bake them according to the clay package instructions.  Here are a few that my daughter, mom and I made. 

Once they are baked and cool fill in the indentations with paint in order to make them stand out. 
I used acrylic paint - and applied it with a little stylist (a very pointy metal utensil, often used for embossing, etc.) 
You could instead try to water down paint, brush it over the letters, and wipe away the excess, but it is difficult.  We tried it and it was hard to wipe away all the excess and still leave enough in the indentation. 
If you don't have a stylist you could try using the tip of a sharp pencil, or mechanical pencil, and dip that into your paint to trace inside the indentation. 
Below is an in progress picture:

I super glued super strong magnets onto the back - and now I can use them on my fridge or these magnetic burner covers I have hanging on the wall near my craft table....

They are super easy, and so fun to personalize!  My mom made some with the words "peace", "joy" and "love"...you could make a whole rock set for yourself or friends!  Because who doesn't love a personalized (easy-to-make) gift?!


image signature


Visit thecsiproject.com

May 14, 2011

Painted Garden Markers


We planted a our little garden last weekend, and it is always fun to see things grow.  I am sure it costs more to maintain than it actually pays back in produce - but it is also great for the kids to help take care of the plants. 
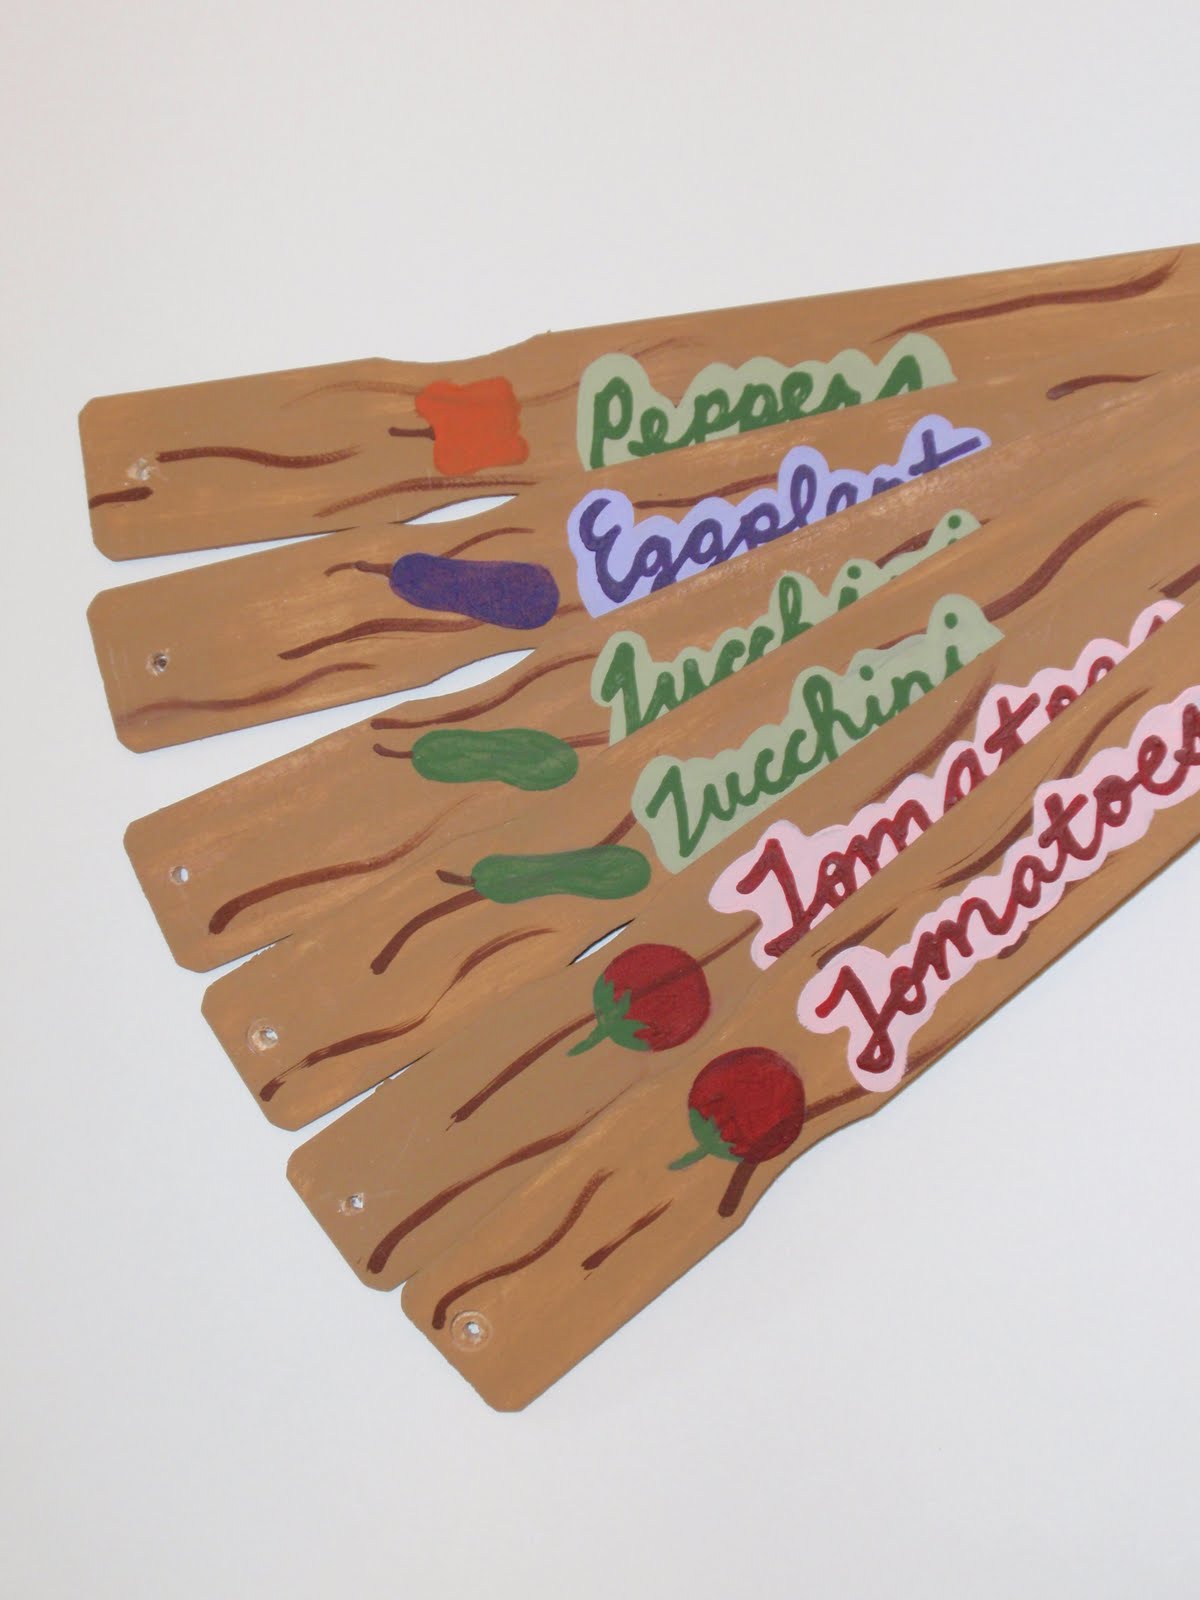
I made these painted wooden garden markers with my daughter, which is a variation of a set that I made for my friend last year
We used paint stir sticks this time - which are great because they are free from the hardware store!
This time we painted them "faux wood" color (all acrylic paint) - but I am torn as to whether I like this look.  The other set I made was very colorful, which I might like better...(take a look at the pics at the bottom of the post)...but these are still fun :)
I penciled in cursive the name of a plant on each marker (which you may or may not be able to see in the picture above).

I painted a bubble of lighter color around the penciled words...nothing to precise:

And then stenciled in the darker letters over the lighter color...

Also painted a little picture of the plant, and drilled a hole in the top to attach the dragonflies!
The dragonflies are my favorite part. 
They are made from 20 gauge copper wire and the cheapest little assortment of colored beads I could find.
To make them, cut a length of cord about 2 feet long:

Make two loops near the middle of the length, each about 1.5" long - making sure they cross each other.

Make two smaller loops crossing and overlapping the larger loops.  These are the dragonfly's wings.

Thread a bead onto one of the long tails, and loop it over the top/middle of the wings - situating the bead on top.  You can wrap the long tail around the middle once or twice if you want. 

String 4-6 beads onto both of the tails hanging down, pushing them all the way up to meet the wings. 

Loop one of the lengths of wire through the last bead, to secure them all tightly to the top - as shown below:

Secure the dragonfly to the garden marker through the hole you drilled, twisting the remaining cord around the body of the dragonfly to hold it upright. 
I also sprayed mine with a few clear coats of polyurethane, to help protect them from the elements. 


They end up being charming additions to the garden, and the dragonflies add extra color and whimsy that I really like. 

Below are pictures of the first set we made - which are a bit more colorful - and also very fun...

I hope you all get a chance to enjoy growing plants and gardens this spring and summer! 
For us, there is nothing like eating fresh food from the garden :)

image signature