Pages

May 28, 2014

Making your own T-shirt Quilt


Recently, our family moved from the Northeast to the Northwest - and it has been an adventure!  In a whirlwind decision we packed up and moved our family in three short weeks - and we're still settling in.  
Part of the deal with moving of course, is clearing out (I know lots of people who consider moving the perfect time to do a household purge, and we were no different).  
Some of the things that have stuck with us though, are the sentimental items my husband and I have had since childhood.  Including a whole bunch of t-shirts.

T-shirts are one of those things that seem to accumulate quickly, and often rotate in the wardrobe.  When I started pulling out a bunch of shirts from my childhood I decided I didn't want them sitting, unworn and forgotten in a tub any longer.  I took the plunge and cut them all up to make myself something useful - a sweet t-shirt quilt!


The process was a bit difficult, but I'm going to attempt to document how I made it, in case you'd like to make your own!

I started out by cutting the logo/picture/patch/whateveryou'vegot from each t-shirt, leaving as much plain t-shirt border to work with as I could.  You can see below how much white space I left around the picture.


If there was something small on the arm or on the back, I cut that out too...


Before trimming anything, I ironed interfacing onto the back of each piece.  This does make the whole quilt a little bit more stiff, but it is SO much easier to work with!  After I had the interfacing on, I didn't have to worry about the t-shirt material stretching while I cut it or sewed it.  I'm glad I used it!

I had the hardest time picking out the interfacing.  If you've ever tried to purchase it at the fabric store, you'll know what I'm talking about.  They had about 30 bolts and I sat staring at them for about 30 minutes. Ultimately, I chose something that felt like medium weight and hoped for the best.
It was Pellon, 950F, Apparel Interfacing.  It worked great :)

Update: I'm working on another and this time I picked 906F Fusible Sheerweight, also by Pellon.  It is not quite as thick, but still keeps the fabric from stretching while I sew it.  I think I like it better!


Now comes the interesting part.

Since I didn't make all my squares uniform size, I had to do a lot of math.   A LOT.  My brain hurts just thinking about it.

Below, you can see some of the papers I used to keep everything organized.  The large paper on the bottom listed every single piece of t-shirt individually, and information about it.

The paper on top was a pattern I made in power-point.  I zoomed out to 10% and made square shapes on the computer that were the actual size of the piece of t-shirt I was working with.

Here's the process, from the very beginning:

1) For each t-shirt piece:
  1. Use a numbered list
  2. Next to each number, write some identifying information about the t-shirt piece so you'll know which is which, then
  3. Measure the t-shirt piece and write down the minimum and maximum dimensions it could be cut to.  Make sure, when writing the maximum or minimum size it could be, that you consider the seam allowance (so leave at least a 1/2" border when measuring the maximum size).  
Now, take that piece of paper over to the computer.

2) Using powerpoint if you have it (could be done in Word too), use the shape tool to make rectangles.  I numbered each rectangle on the computer to correspond to a number on the list.

3) Starting in a corner, arrange the rectangles.  Check your numbered list to size the rectangles based on the t-shirts you have.  Adjust the size of the rectangles on the computer to make them fit together, and fit the size t-shirt pieces you have.

(Warning, this took me a LONG time).  It requires checking your numbered list for a t-shirt the size you need.  Then, making them fit - moving things around when you run out of pieces small enough to fit.  You could supplement with small blank t-shirt squares if you absolutely have to fill a hole.  But I found that the small logos I took off of the arms worked really well to fill in the tiny gaps.  Make a check mark next to the number on the list once you have used that t-shirt in your pattern.


Below, you can see a screen shot of my powerpoint pattern.  To help, I even made rectangles the same color as the t-shirts, so I could make sure I was arranging the colors in a way I liked.

4) Once I had my pattern finished, as seen below, I re-wrote my numbered list and wrote down the final dimensions of each piece based on the size of the rectangle in powerpoint.  Remember, I made each rectangle to scale, so when I clicked on one, I could see the exact size (for example: #5 was 11" x 13").

I also checked my work multiple times!  I made sure that if I added up the width across the top, it matched each "row" of squares all the way down the quilt.  Same with the "columns."  I put those words in quotes because there are no exact rows and columns.  So I went across or down in the best way I could to make sure the width always added up the same and the length always added up the same.  It is easy to be off by 1/2" when trying to align the squares in powerpoint.  (See where the math can start to hurt your head?  You just wait...)


Here's another picture of a t-shirt quilt pattern I made later.  I typed in the dimensions as well, which helped!


Here is the really important math step!!

5) Take your numbered list (which should show the size of each t-shirt square) and make a new column to add in seam allowance!!!  The powerpoint pattern does not take seam allowance into account.  EVERY SQUARE needs to have seam allowance added to the length and width.  I decided to use exactly 1/2" seam allowance, so I added 1" to the length and 1" to the width of every square. 
Here's an example of my list:

Then, you start trimming your t-shirt pieces.  Find piece #1, and cut it to the correct size (the size with the seam allowance factored in), and do this for all the pieces.  


6) Once all the pieces were trimmed with the correct seam allowance, it was time to sew them all together.  Carefully using my pattern (which I printed out using a screen shot) I started sewing small sections together.

Take a look at my powerpoint pattern again:


See the yellow outlined square?  That is the first section I sewed together.  In the upper left I sewed #20 & #19 together.  Then, I sewed those to #13.  Then, I sewed that to #5.  (see pic below)


Then I sewed #26 and #26b together, and added it to the #5 piece, which was sewn to the other 3 pieces.  (you can see what I mean below)
If you look carefully, do you see the process?
Next came #4 with #24.  Then added those to #6.
Next #40 with #45.  Then added to #43.  Then added to #42.  Etc. etc.


Small section after small section I sewed together, careful to use the exact 1/2" seam allowance I had allotted myself.  Then, I sewed those smaller sections together to make bigger sections.  Almost the entire quilt I was able to find exact sections to sew together (meaning I could match up two entire edges perfectly).  Only once did I have to sew an intersecting piece half way through another square. It required me to think it through, but if I was careful I could almost always sew full pieces together.


Here is the first half of the quilt sewn together...

And the other half...

And finally, here is the completed quilt!
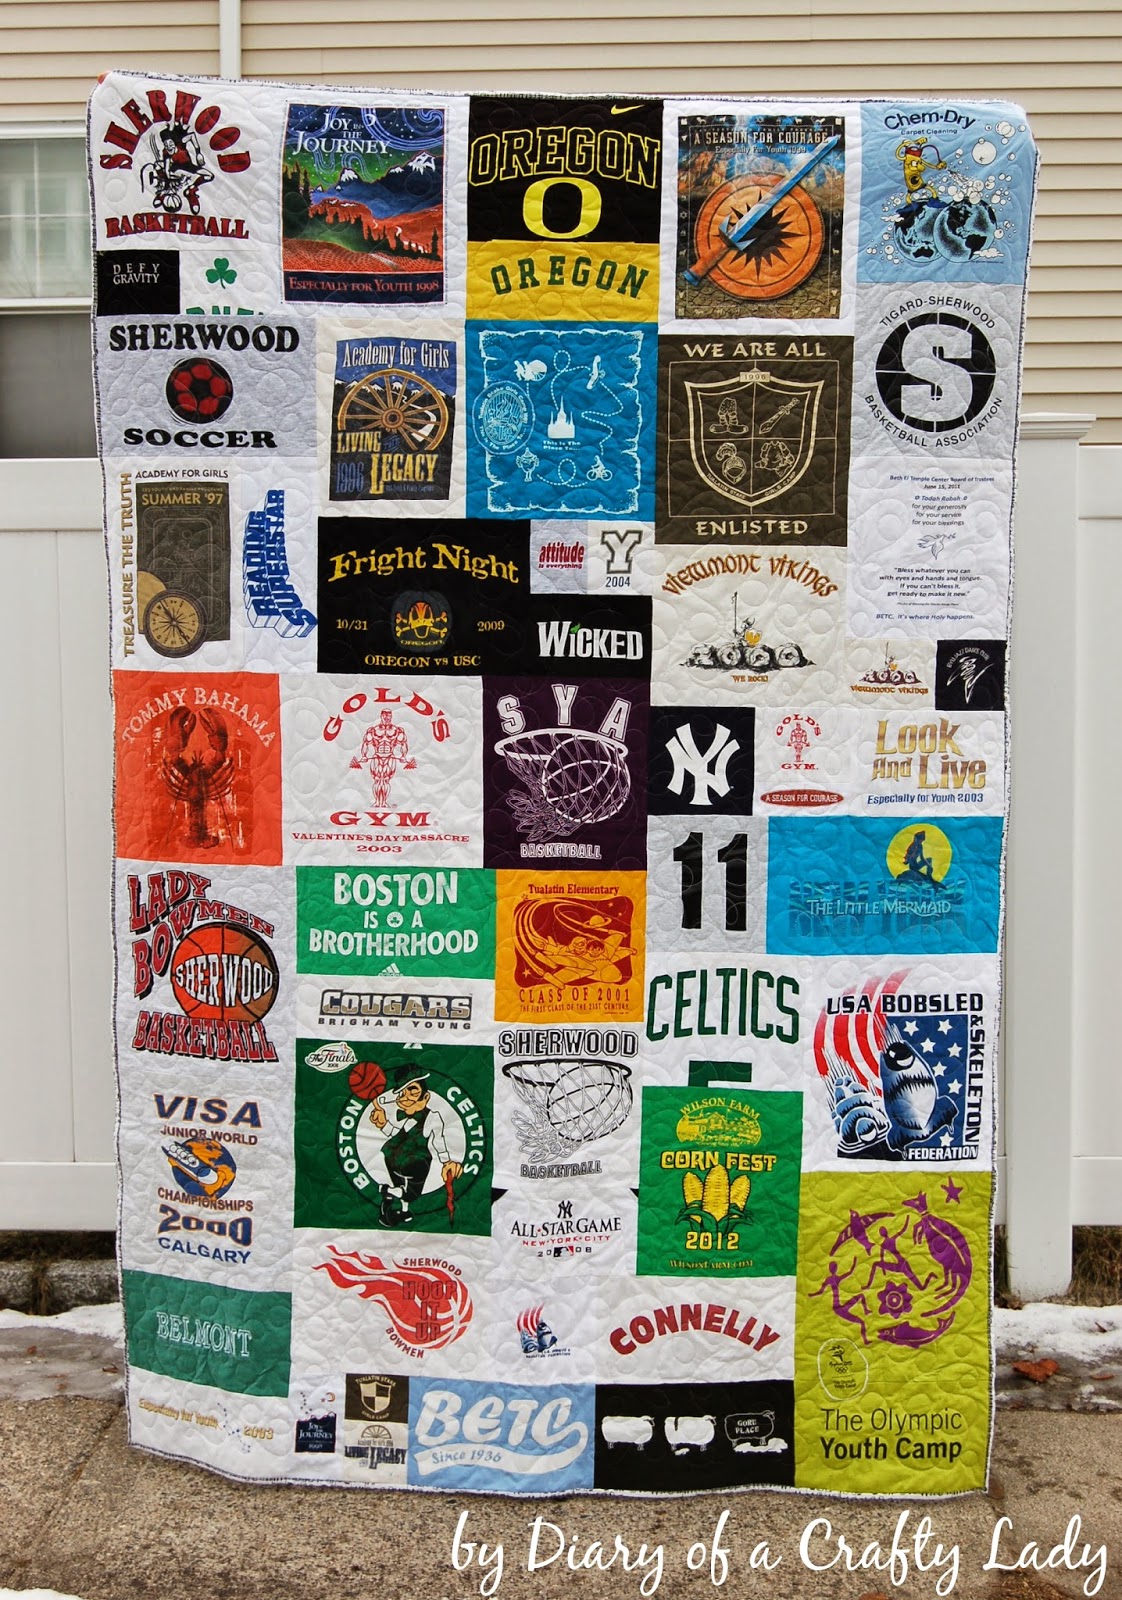
We used a simple, swirly pattern to quilt it, so as not to detract from the t-shirt designs.  I used a flannel for the backing, which makes it soft and warm.  I did use the thin, natural cotton batting in between the tshirt top layer and the flannel backing layer.  The quilting machine could handle all those thick layers - but just barely :)


I am completely in love with the way it turned out!  It represents many wonderful memories, and there is even a t-shirt all the way back to my elementary school days!


I have seen quite a few t-shirt quilts, and I have always admired them.  It was a huge challenge to have all different size squares, but I love having everything packed together, cropped tightly, and I love that this quilt is so unique!  No one will ever have another one like it, which makes it that much more special.  My husband has already started gathering his t-shirts so that I can make another - and I have to admit, despite the hard work (and the endless math), the idea of making another one sounds fun ;)
image signature
Follow me on Facebook


May 9, 2014

Personalized Drawstring Bag Birthday Gift


My 7 year old daughter loves to make things (takes after her mother I guess ;))
When her best friend was having a birthday party, we wanted to make something that would be fun and useful, and my daughter wanted to help.
We got her some little toys, and to keep them all together, we decided to make her a personalized drawstring bag to hold everything!


We took a piece of muslin and my daughter drew a picture very lightly in pencil, including her friend's name.  She then took embroidery floss and used a running stitch to cover her lines in stitches.  She had a great time picking colors, threading the needle, stitching around her sketched lines, and doing it all by herself!  When she was done I ironed a piece of interfacing on the back to keep all the strings secured.


A simple tutorial for the drawstring bag can be found by clicking here.  This bag is larger than the bag in the tutorial - at about 10" wide x 13" tall.  Before sewing it all together though, I zig-zag stitched around the picture my daughter made onto one of the outside bag pieces (see above).

This bag is really simple, with only 4 pieces of fabric, all the same size.  2 for the outside of the bag, 2 for the lining.


One small difference in this bag from the tutorial is that I put 2 lengths of ribbon through the casing, so that tails were coming out either side.  Do this by starting the 2 ribbon pieces on opposite sides before winding them through.  This will make it cinch evenly as opposed to cinching from one side (though either one is fine!).


My daughter was very happy with the way it turned out, and it gave us a really fun way to deliver the birthday gift!

You could make a whole set of customized drawstring bags for your child's own little toys, or make one in any size, as a great way to deliver a gift to a friend!
image signature
Follow me on Facebook


May 2, 2014

Spring Dinner Party - Bee Anxiously Engaged


Spring is finally showing up in most parts of the country (it took a while for New England) - and to celebrate the Relief Society Birthday in March, the ladies in our church had a spring themed dinner party!

As head of the planning committee, I had a great time creating some spring decor in anticipation of the warmer weather, and blooming flowers.  Here's a look at some of the things we created!


Our theme was "Bee Anxiously Engaged" - a play on the phrase from a wonderful talk by one of the leaders of our church.  We talked about finding ways to be engaged in small acts of service, and it was a wonderful, uplifting night.


Fresh flowers graced our centerpieces.  We used yellow, black and green as our color palette, and these flowers fit in beautifully!  My friend used glass milk bottles for vases, and wrapped yellow scrapbook paper secured with adorable washi tape around them.
I added a little flag onto a chevron paper straw with stamped phrases beginning with the word "bee" ... "bee happy", "bee kind", "bee true" ... etc.

The "table runner" was made from popsicle sticks that I hot glued together into hexagon/honeycomb shapes.  Easy, inexpensive and fun!


A few weeks before our event, I grew TONS of wheatgrass in my kitchen!  I started with a few cups of wheat berries, which are very inexpensive, and followed instructions I found online to soak them and plant them.

I used tupperware and other plastic containers that I was ready to get rid of, with a little bit of dirt, and it grew out of control!!  I was afraid 3 weeks would not be enough time to grow it tall - but I had to trim it at least 3 times, and it was still 6 inches long the night of our event!

We re-potted the grass into peat pots - really cheap at the dollar store - and had enough for one at each place setting.  I love how they turned out!!

Again, my friend took her cute yellow paper and printed off a hexagon shape with our theme printed on it, and a bee picture, and attached it to the pot with the washi tape.

I printed a bunch of bee images, punched them out with a 1" circle punch, and hot glued 2 back to back with a bit of wire in between.  The bee on the wire stuck out of the dirt in each pot and looked really cute.


We set each place with a plate, napkin, and silverware.  The napkin had the silverware set on it, with a quote from the theme talk printed onto paper and wrapped around it.


Dinner was fabulous.  We made honey chicken skewers, honey glazed carrots and had volunteers bring rice and green salad.

For dessert we had a birthday cake contest - which we have done for years, and is always a big hit!


I used the same paper straws, with some hexagon shaped numbers glued on, to stick into each cake to identify them.


It is always so fun to sample a little bit of each cake, and then vote for your favorite!


The top three winners got these little goodie bags with a hand towel and honey bear inside ;)


It was a fabulous evening, and so nice to celebrate spring with friends.  Here's to all of us remembering to be anxiously engaged in helping those around us.  You never know when a small act of service, even a smile or kind word, will make a huge difference in someone's life!


image signature
Follow me on Facebook


March 17, 2014

How to Bind a Quilt by hand - with Mitered Corners


Finishing my first quilt was a big accomplishment for me!  I've been working on a few others since then, and my love for sewing and quilting continues to grow.  
Each time I finish a quilt though, I have to call my mom to remind me how to sew the binding.  I decided I had better try to document my process - which ultimately works very well and turns out beautifully!

Warning: this is a doozy.  There are tons of pictures, tons of words, and I'm still not sure it will be clear enough to follow.  Feel free to leave comments if you have suggestions or questions.

Binding a Quilt (front side machine stitched, back side hand stitched) with Mitered Corners

Choose a binding fabric and cut it into 2.75" strips.  Sew all the strips together (short ends, right sides together, open up the seams and press).  At this width, the binding ends up being thin - about 1/2" on either side of the quilt.  

You'll need to add the lengths of all 4 sides of your quilt together to know how long to make your binding (plus a few extra inches).   

Iron the entire long strip in half, lengthwise, wrong sides together.  See picture below, left. 


Starting on any edge of your quilt, at least a few inches from a corner (I start in the middle of one side), pin the binding to the top side of the quilt.  Raw edge of quilt and raw edge of binding should be together.  See picture above right.  The folded edge of the binding is facing toward the middle of the quilt. 


Keep pinning the binding to the quilt every few inches, and when you get to the corner, you'll follow the steps below:

Pic 1) Fold the tail of the binding straight up, positioning it so that its right edge is parallel with the next side of the quilt.  The strip should form a 45 degree angle.

Pic 2) Fold the binding down, leaving the top fold flush with the edge of the quilt top behind it and its raw edge aligned with the next side of the quilt.  

Pic 3 and 4) Shows that the 45 degree angle should be intact under the fold.  

Once the binding is pinned all the way around the quilt, follow the steps in the picture below to sew the first side with a machine.  Machine stitching the binding to the top side of the quilt gives you a nice even stitch on the side that people will primarily be looking at.  


Beginning in at least 1" from the beginning of the binding, start sewing the binding to the quilt with 3/8" seam allowance (this is the edge of my presser foot).  You want to leave this 1" binding flap for easy finishing later on.  

Pic 1) When you near the corner make sure the angle is folded flat and away, as in the picture.  Stop sewing at 3/8" from the corner (the same distance from the edge as your seam allowance).  Back stitch a few stitches to secure.  Cut your thread.  (The red dash shows the section left un-stitched).  

Pic 2) Fold the corner (the 45 degree angle fabric) over the other direction, so that the binding is flat based on the next side of the quilt.  

Pic 3) Beginning 3/8" from the corner/top edge, start sewing along this next edge with 3/8" seam allowance until you reach the next corner.  (The red dash shows the section left un-stitched).
FYI: I always use a few back-stitches when I start sewing to secure.  

Repeat these steps 1-3 for all the sides and corners.  (Ultimately, this will create a mitered corner.)

Pic 4) Where the two binding ends meet, you will need to leave an unsewn section in order to tuck one end inside the other.  So, when you reach the point where you began sewing the binding to the quilt, leave 1" unsewn. 


Below, you will finish sewing the binding on the front side of the quilt by closing the gap.

Pic 1) Trim your binding with 1" overlap.  

Pic 2) Fold the raw edge under on one end by 1/2".

Pic 3) Tuck the other end of the binding into the folded end of the binding, as shown.  

Pic 4) Lay the binding flat against the quilt, with one end tucked inside the other.  Pin it down.  Complete the last couple inches of the sewing with the same 1/4" seam allowance.  

Below is a picture of the binding entirely machine sewn on the first (front) side.


For the back side of the quilt, the binding will be hand sewn using an invisible stitch.  Follow the steps below for an explanation on this process:

Pic 1 - way down below) Beginning in the middle of one side, fold the binding from front to back, making the crease along the edge of the quilt.   Pin this down for a foot or so.  I did not pin my binding all the way around.  I found it was difficult to keep from getting poked while working on it!  I pin to about a foot ahead of where I'm working as I work my way around the quilt.  The binding should lay just past the machine stitching line.  You want to cover this stitch line up on the back with your binding.  

Pic 2) Begin stitching the binding to the backing by hand, using an invisible/hidden stitch.  

INVISIBLE STITCH
Use a single strand of complimentary color thread.  Tie a knot in the end.  Pull the thread through the backing fabric between the edge of the quilt and the machine stitching line.  See diagram below.  

Following the diagram below, you go up through the red dot, catching a piece of the edge of the binding.  (This is the folded edge of the binding).  Then pull your thread all the way through.  

Go down through the blue dot just above it, catching only the backing (do not go through to the front of the quilt). Your needle will then come up through the red dot diagonally across from it (about 1/4" away), catching a piece of the binding.  Pull your thread all the way through. 

Again, go down through the blue dot, catching only the backing.  Your needle will then come up through the red dot (diagonally across from it), catching a piece of the edge of the binding.  Pull your thread all the way through.  


You will only see a small bit of thread (between each set of red/blue dots) by doing it this way.  Nearly invisible!

 Repeat this process until you get to the end of your thread.  Loop and knot your thread under the binding, between the machine stitched line and the edge of your quilt, to tie off.  


If this is not clear, I encourage you to look up hidden stitch or invisible stitch on youtube - there are lots of great videos to help!  I always have to use a thimble or wrap some masking tape around my finger a few times to keep my finger from hurting while I push the needle through.  I use a tiny, sharp needle.  


Pic 3) When you reach a corner, carefully fold the binding over on both sides of the quilt near that corner.  With a little help, the corner will naturally fold to form a point.  You may have to prod and tuck a little bit, but it should end up looking like the picture.  

Pic 4) Continue to use the invisible stitch all the way to the inside point of the corner, and then poke your needle all the way through to the front of the quilt at that inside point.  

Continued below:

Pic 1) You have poked your needle all the way through from the back, and it will look like this poking out the front (pink is the front of the quilt). 

Pic 2) Pull the thread through, and begin using the invisible stitch to go up the corner of the front side, to the top.  Once you reach the top, poke the needle all the way through to the back.  

Pic 3) You have poked your needle all the way through from front to back, and it will look like this poking out the back.  

Pic 4) Pull the thread through, and begin using the invisible stitch to go down the corner of the back side, returning to the inside point on the back of the quilt.  

You will then continue your invisible stitch along the next side (see below).  For each of the corners you will repeat steps 1-4 above.  


Once you have lovingly (or cursingly) stitched the binding all the way around your quilt, it will look spectacular!!  And you'll have a beautiful binding on a quilt you can cherish forever ;) 


I tell you -- quilting can be addicting!  I'll show you some of the other quilts I've finished since this one - and don't be surprised if this becomes a regular thing ;)  
Stay cozy!
image signature
Follow me on Facebook