Pages

October 31, 2013

Happy Mario Halloween {Plus a Nintendo Controller Costume!}


We had a blast trick or treating tonight!  Grandma is visiting and we whipped up a quick Nintendo controller costume for her - it was a hit!


I took some cardboard - cut 24" long x 10.5" wide - wrapped it in wrapping paper (backward so the white was showing) - and put 2 black pieces of construction paper in the middle...

Then, I cut out all the little parts from construction paper, computer paper, file folders - anything I had that was the right color...

I taped the pieces down and covered the whole thing in contact paper.  The back piece was the cardboard wrapped in plain white, and we strung the two together with ribbon, to hang over her shoulders....and voila! Cute Nintendo Controller!


We got lots of compliments - and did our traditional trick-or-treating on Beacon Hill in Boston - it is AMAZING down there!  If you ever get the chance to go - do it!  The atmosphere is festive, and the candy haul is pretty overwhelming... ;)

Hope your Halloween was safe and fun!

image signature
Follow me on Facebook


October 30, 2013

Old Book Covers for {Cookbooks; Scrapbooks; Journals, Photo Albums...} plus *10 DIY Ideas*


Sometime, old books just call to me (and my mom).  These are my mom's collection of old hard cover books, some of which she has repurposed.  When I was visiting her, I took a couple trips to the thrift store to pick out some for myself!  The covers are colorful, the font is charming, and pictures are funny.  Plus, old books can have a million uses!  


In our case, we have turned some of these old books into covers for other papers...like recipes, birthday cards, Christmas cards...and they are so fun!

Here's how we do it:


Find yourself some hardcover books, in the size and color you like.

Using an exacto knife or box cutter, carefully slice the front and back pages that connect the cover to the block of pages.  If you slice close to the spine, it will look like this one below when you are finished:


If you cut up a few, you will have a beautiful set of book page blocks to stack and use on a mantel or bookshelf (see below).  I tied this set with baker's twine and set a Halloween decoration on top...
OR you could use the pages to make one of the many book page crafts that have tutorials all over the web.  I have made a magnetic board with book pages, my sister has made some awesome centerpieces and book page wreaths.  Really, the possibilities are endless!


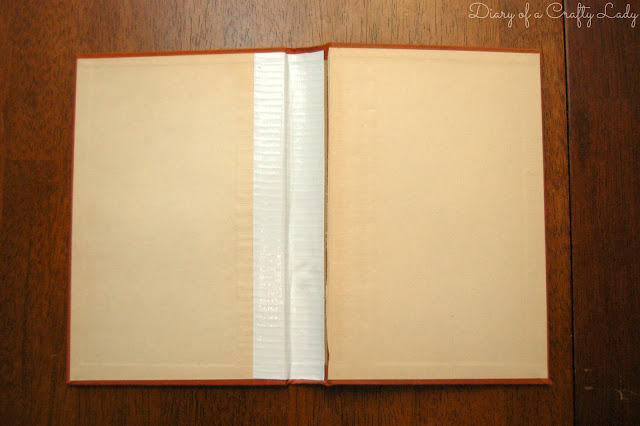
Back to the covers - take a piece of white duck tape, and cover one side of the inside spine...

And then put another piece, overlapping the first, on the right side of the spine (see below).  This will provide extra durability.  


Below you can see all the book covers I cut and covered with duck tape...

Next, use a rivet stamper/hole puncher to punch holes for the binder rings.  My suggestion, think about what you want to put inside before you place your holes.  If you have short things, and your holes are too far apart, it will be hard to store the papers inside using only 1 binder ring.  I ended up punching mine each about 3/4" from the edge of the spine, and 1" from the edge/top/bottom of the cover.  I also used rivets once the holes were punched - but this is optional.  If you don't use a rivet, I would suggest dabbing the edges of the holes with super glue so that they don't fray.


Now, your book covers are ready to store papers - just hole punch the papers where your holes are, and thread the binder rings through.  My mom also took things like stickers, tags and vinyl and other rub on letters and marked the spine and covers of her books so she knows what is inside - which I love!


Aren't they darling all lined up on the shelf??

Want more inspiration?  Here are some other book cover projects from around the web:


Now get yourself over to the thrift store and find some old books!

image signature
Follow me on Facebook


October 27, 2013

Luigi, Bowser Jr. & Star {Super Mario Brothers Halloween!}


I did it!  In time for our church Halloween party - I finished our family Super Mario Bros. Costumes!!


My older darling daughters I finished first - Mario and Princess Peach.  You can see my post about their costumes here.  

My husband was Luigi (he ate a mushroom, so he was a big Luigi). I followed the same tutorials for his costume that I did for Mario - just super sized them.   


It took me a little while to figure out what I should be.  I was going through the list of bad guys, and came across this post from Remarkably Domestic.  Her son was Bowser Jr. - and I was impressed!  I set out trying to figure out how to make myself this little guy...

Here's how I made myself a Bowser Jr. costume:

October 25, 2013

Ashley's Halloween House {Indoor Decor and Zombie Party}


Ready for a little more of the tour of Ashley's delightful Halloween house?!
Like me, my sister has made many of her decorations, and she likes to add in a bit of the creepy element ;)  

These book page wreaths are a mash up of different items.  Individual book pages are spray painted, rolled, and hot glued in a cone shape.  Then they are all glued together in the shape of a wreath.  This is a great addition to any Halloween decor, because black and white always fits in.  


She has made a few of these, and in the middle she puts signs, fabric, little Halloween items -- whatever she's got that looks cool together, and covers the middle of the wreath.  

She has great style when it comes to layout and mixing and matching different things.  I love the candles wrapped in book pages, the red and black "flower" arrangement, the spooky pictures, and the mask (which she also made!).


She also made these spider sacs (see what I mean by creepy??).  There is a tutorial for these here if you wanted to make your own.  I keep thinking these would be really creepy hanging outside the front door...


And I wish you could all attend one of her legendary parties!  This year, the theme was zombies, and I seriously got goose bumps when I got her invitation in the mail.  It was gross.... (in a good Halloween sort of way) ...


A couple cool zombie touches - 
Check out this punch... 

She even served "hand-burgers" - the bun, patty, cheese, lettuce, all cut into the shape of a hand with a cookie cutter.  So funny.  


These are her touch and feel boxes.  Filled with mystery items, guests have to reach inside a box labeled "brains" or "eyeballs" or "teeth" and guess what the items really are to win a prize.  

We're talking things like: 
peanut butter for earwax
boiled cabbage for skin
canned plums for eyeballs
pudding and peas for vomit
dried apricot for ears
jello with peaches in it for brains
raisins and pistachios for warts
pistachio shells for fingernails
cooked linguine with oil for intestines
cooked orzo pasta with oil for maggots
candy corn and popcorn kernels for teeth
and baby pickles for fingers 

Sounds yummy, doesn't it?? Not an activity for the faint of heart! ;)


And don't even think about trying to leave....she'll get you....

We've only got a few more days until Halloween!  Stay Scary!


image signature
Follow me on Facebook


October 23, 2013

DIY Witches Broom from Sticks


There are always more projects that I want to do than time to do them - but such is the life of a crafter (and mother)!  Here is a fun and quick project though - great for a porch or entryway - and costs [almost] zero dollars!


Over at brieda with a b you can see the one she made, and the simple tutorial.  

I didn't have the kind of plants she refers to, but twigs and branches I picked up near my house worked great!  They were all fairy straight, and I just trimmed the ones that were really long.  

I already had the string, burlap, and hot glue to wrap and tie around the sticks - so this project cost me nothing, and only took a few minutes!


I hung my new witches broom with some string from a nail I already had in the wall.  This is my side porch, and it has been fun to set some Halloween decorations out there.  My Halloween directional post sign is from a couple years ago - see it here.  


I hope you have fun making some simple decorations around your home.  My kids and I have so much fun being festive!  
Happy Fall everyone!  


image signature
Follow me on Facebook